MCP Keys
Connect an AI assistant — Claude, ChatGPT, Cursor, or your own agent — directly to your course data, so it can read your courses, students, enrollments and settings, and (if you allow it) make changes on your behalf.
There are two ways to let an assistant in, and Settings > Developers handles both under the MCP access card:
- Sign in with your Shopify admin. claude.ai, Claude Desktop and ChatGPT send you to your own admin, where you approve the access yourself. Nothing to create, nothing to copy. For claude.ai it is the only way in — it runs in your browser and cannot start a program on your computer. For Claude Desktop and ChatGPT it is the quickest route and the one we recommend, but not the only one.
- Create an MCP key and paste it into the assistant. This is for tools that connect without a browser sign-in: Claude Code, Cursor, or your own agent — for ChatGPT, if you would rather use a key, and for Claude Desktop, if you would rather run the server on your own computer (MCP Desktop Setup). You can have up to 3 active keys at a time. Assistants you let in by signing in do not use up any of those 3.
Everything that can reach your app — keys and signed-in connections — sits in the same table on that page.
🔗 Connect Claude or ChatGPT, no key needed
Use this for claude.ai, Claude Desktop and ChatGPT. All three take the same Server URL and send you to your own Shopify admin to approve the access — only the screen where you add the connector looks different. The pictures below follow ChatGPT; Claude asks for the same things under different names.
-
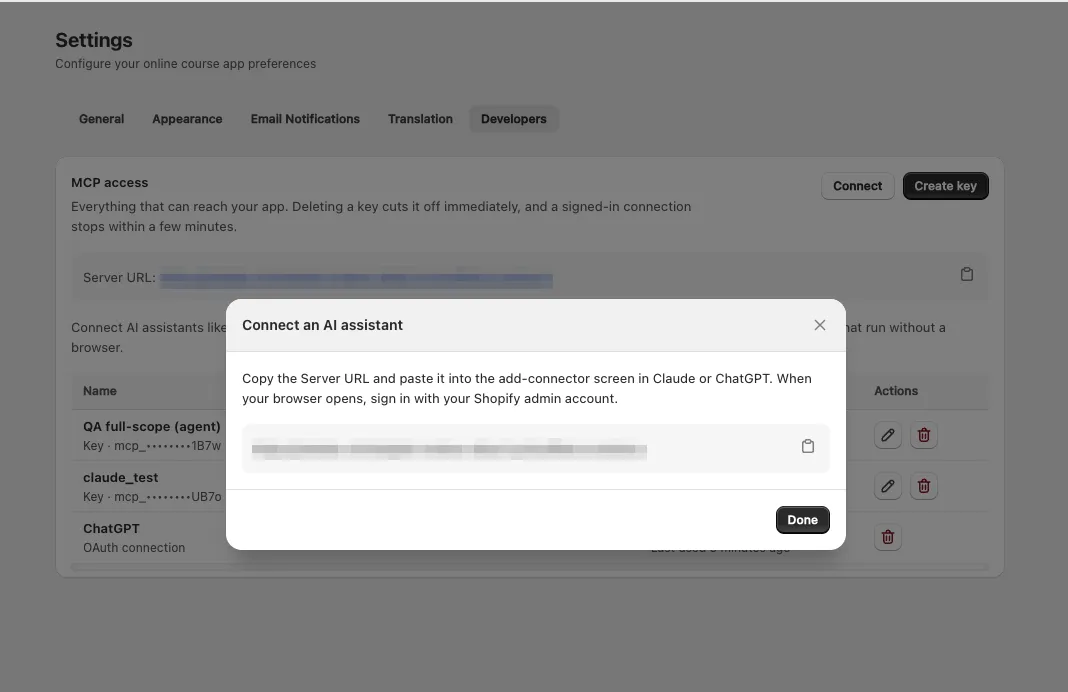
Open the app > click Settings > Developers > Connect. The Connect an AI assistant window opens with your Server URL and a copy button:
Copy the Server URL and paste it into the add-connector screen in Claude or ChatGPT. When your browser opens, sign in with your Shopify admin account.
Copy the URL and click Done.
- Open the screen where your assistant adds a custom connector. In Claude that is Settings → Connectors → Add custom connector; in ChatGPT it is Settings → Plugins, then add your own, which opens New Plugin.
- Give the connector a name, paste the URL in as the server URL, pick OAuth as the authentication, and leave any OAuth Client ID / OAuth Client Secret fields empty. Your assistant and the app sort those out between themselves.
This window has no field for a key or a header, and it does not need one — the sign-in below is what grants the access. If you are looking for somewhere to paste a key here, you are on the wrong path.
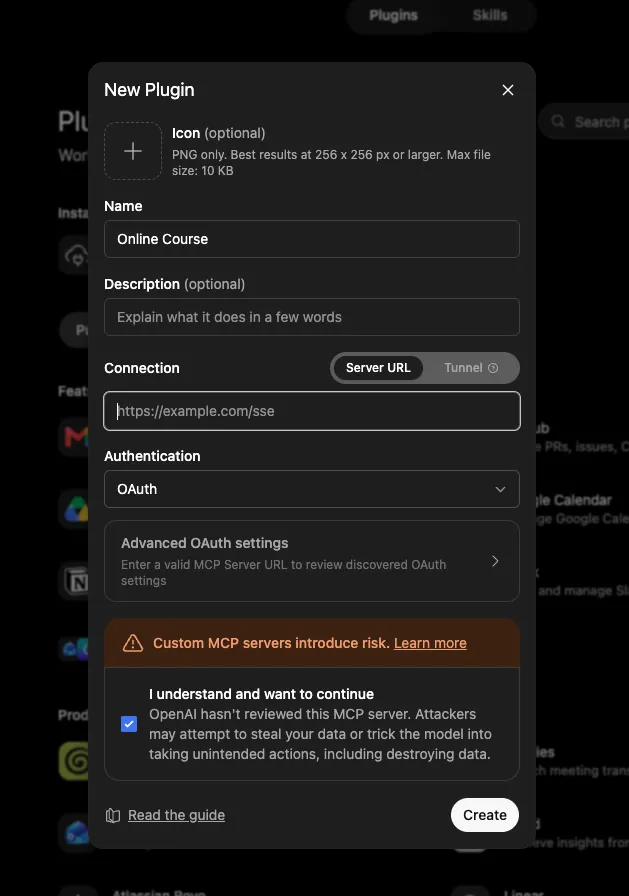
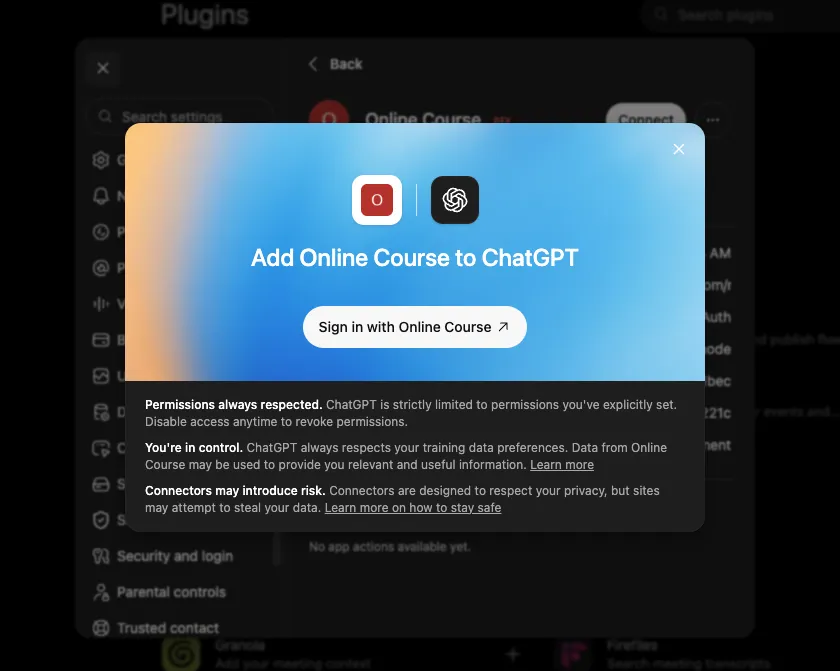
- Confirm it — Create in ChatGPT, Add in Claude. The assistant then offers to sign you in; click Sign in with Online Course.
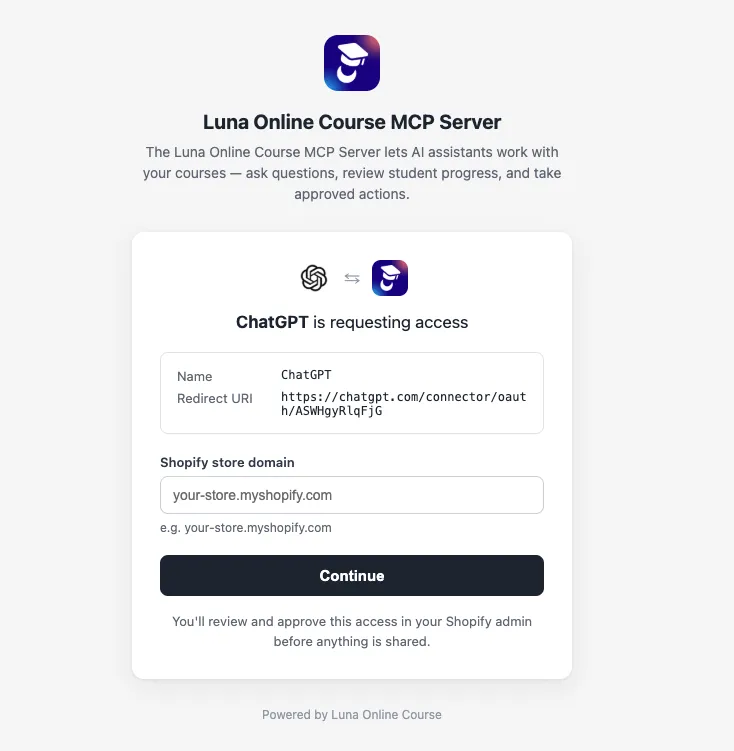
- Your browser opens the Luna Online Course MCP Server page, which names the assistant asking
to get in. Type your Shopify store domain (
your-store.myshopify.com) and click Continue.
-
You land on Approve MCP access inside your Shopify admin. Choose two things:
- Permissions — Read course data (it can look at courses, lessons, students, enrollments, progress and settings, and change nothing) or Read and manage course data (it can also create, update and permanently delete courses, modules and lessons, add students, and change app settings).
- Connection expires after — 30 days, 90 days, or 180 days. When that date passes, the assistant stops and asks you to approve it again.
-
Click Approve access — or Deny access if you did not start this.
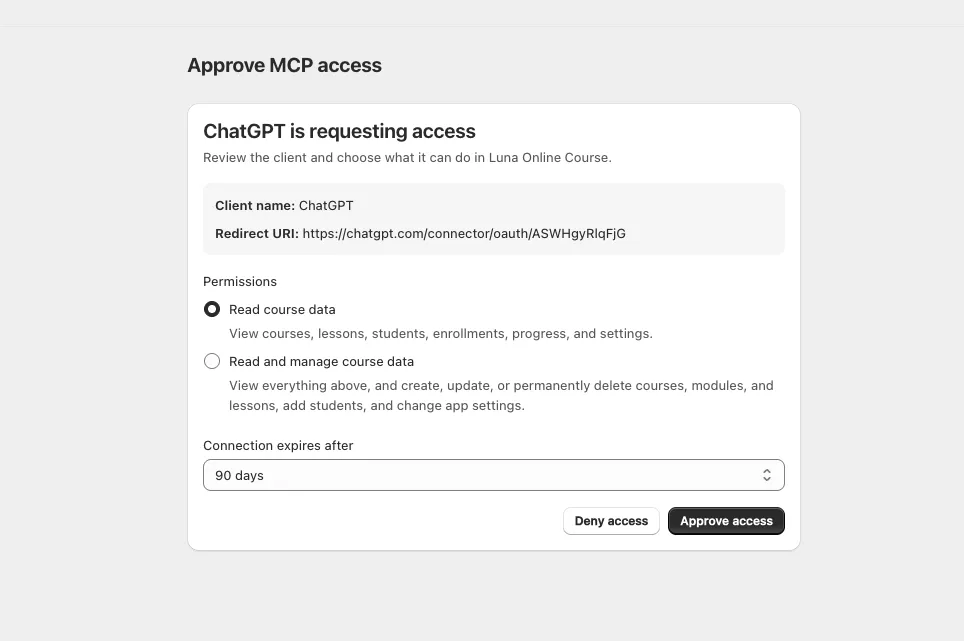
This screen is the only place the access is granted, and it lives in your Shopify admin, behind your own login. If a connection screen ever asks for your Shopify password anywhere else, close it.
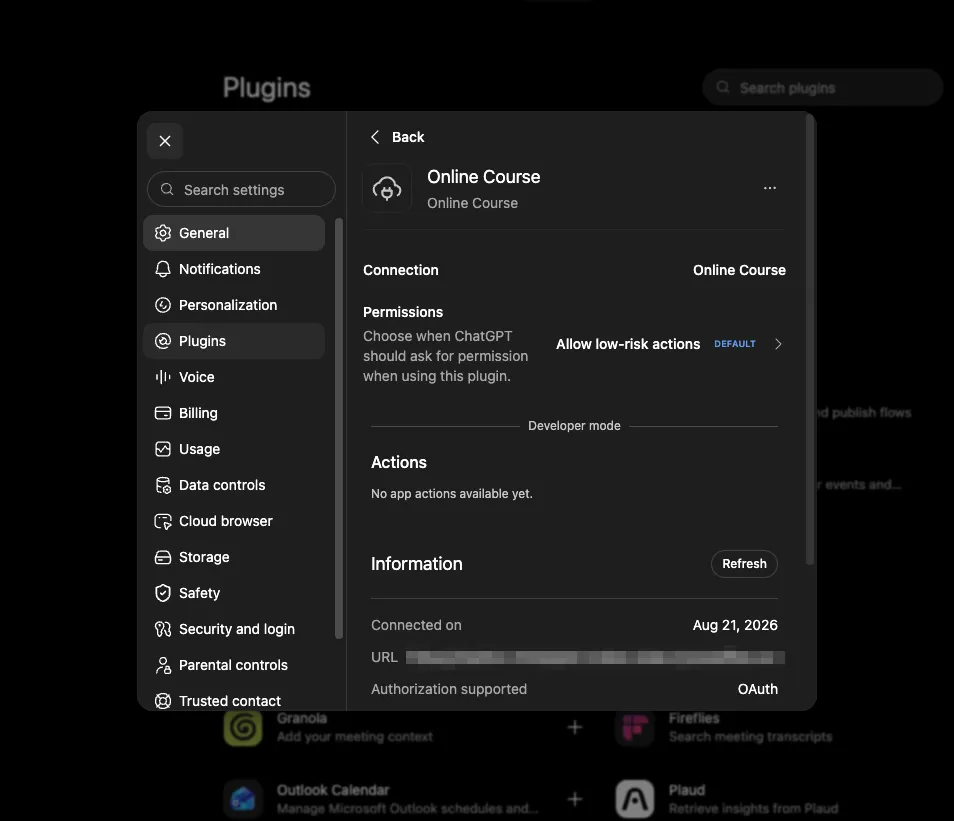
Your assistant comes back connected — it shows the date it connected and OAuth as the authorization — and a new row marked OAuth connection appears in your table.
🔑 Create a key
Use a key for Claude Code, Cursor, or your own agent — or for ChatGPT and Claude Desktop, if you would rather hand the assistant a key than sign in. Claude Desktop takes its key through the local setup on MCP Desktop Setup.
- Open the app > click Settings > Developers
- Click Create key
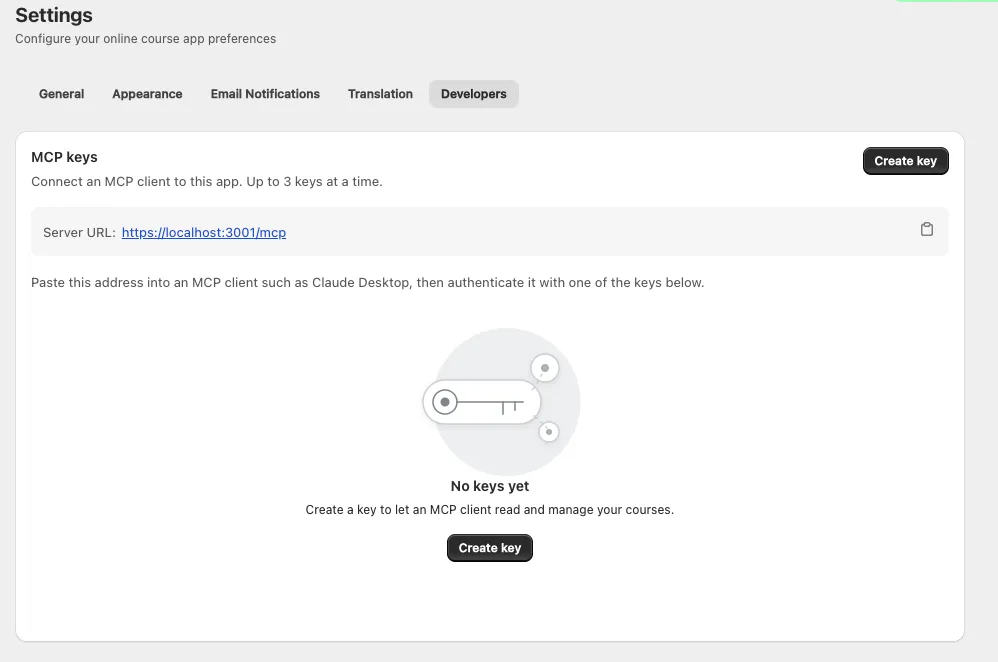
- Give the key a name that tells you where it is used — for example
Claude DesktoporSupport agent - Choose an expiration: 30, 90, 180 days, or no expiration
- Choose what the key may do. Both groups start fully switched on — open them and turn off anything this assistant does not need. What each permission unlocks lists exactly what you are granting.
Read access — the four areas the assistant may look at: Dashboard, Course, Student, and Setting.
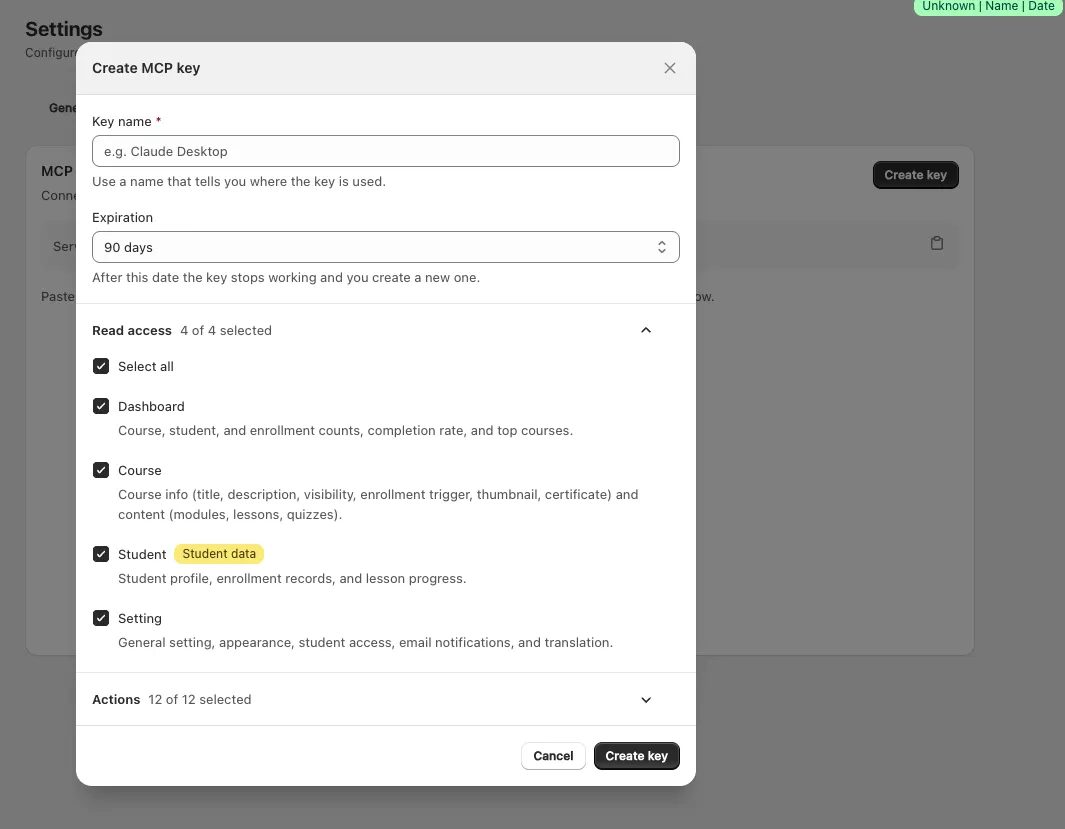
Actions — the 12 changes it may make, grouped by Course, Student, and Setting. These change live data, so be deliberate here.
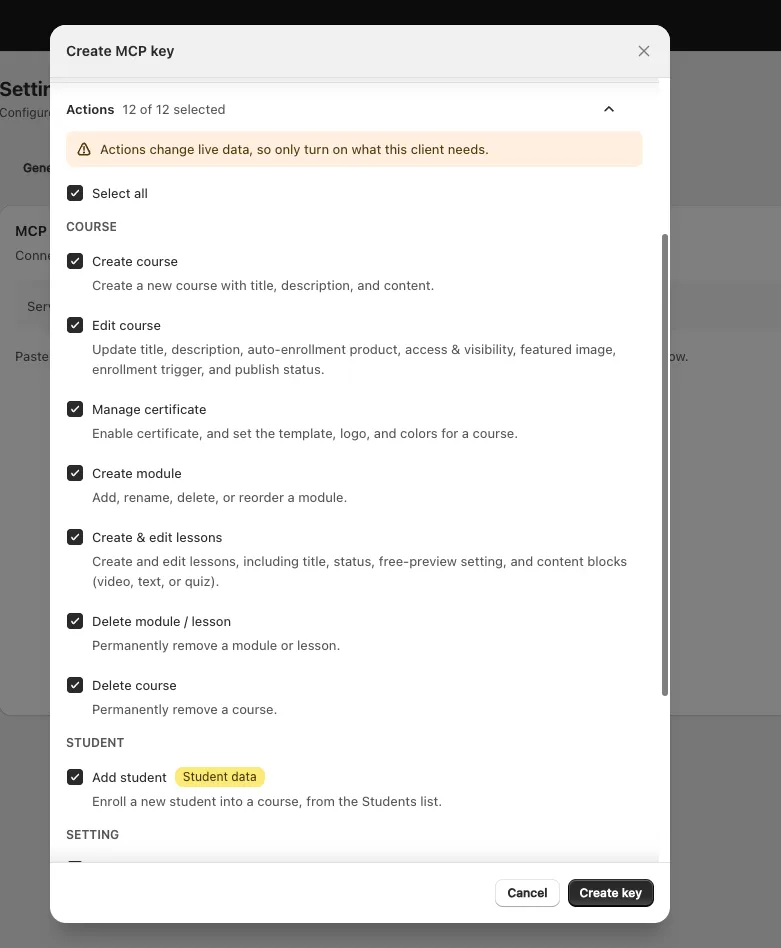
Permissions marked Student data give the assistant access to student names, emails, enrollment records and lesson progress.
- Click Create key
📋 Copy the key
The key value is shown once, right after you create it. Copy it, or use Download .txt to save it as a file, then tick I've saved this key somewhere safe.
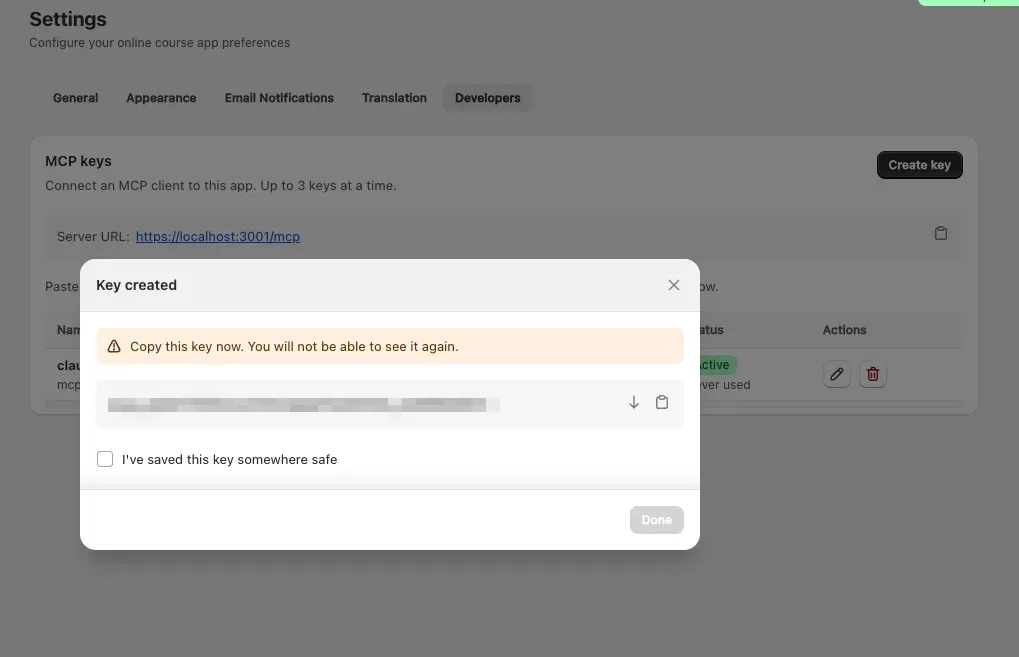
Nobody can look this value up again — not you, and not Avada support. Only a fingerprint of the key is stored, never the key itself. If you lose it, you'll have to regenerate it.
🔌 Connect your assistant with a key
Every assistant in this group needs two things: the Server URL, shown on the Developers page
with a copy button, and your key sent as an Authorization: Bearer <your key> header. Claude
Desktop is the exception — with a key it runs the server on your own computer, so the key goes in
its config file rather than a header. That setup is on
MCP Desktop Setup.
Connecting claude.ai, Claude Desktop or ChatGPT? You don't have to create a key — all three can sign in through your Shopify admin instead. See Connect Claude or ChatGPT, no key needed.
Claude Code
claude mcp add --transport http avada-course \
  <your server URL> \
  --header "Authorization: Bearer <your key>"
Cursor and other MCP clients
Add an HTTP MCP server pointing at your Server URL, and send the key as an
Authorization: Bearer <your key> header.
ChatGPT
ChatGPT signs in without a key, but a key works here too if you prefer one. Add an MCP server with:
| Type | Streamable HTTP |
| URL | your Server URL |
| Header | Authorization = Bearer <your key> |
✅ Check it works
Ask your assistant something simple, like "How many students are enrolled this month?".
Back in Settings > Developers, the line under that row's Status badge changes from Never used to the time it last answered. That is the quickest way to tell a key or a connection is really working. A row still marked Pending never finished signing in — that line tells you to connect again from the app instead.
👀 Read the table
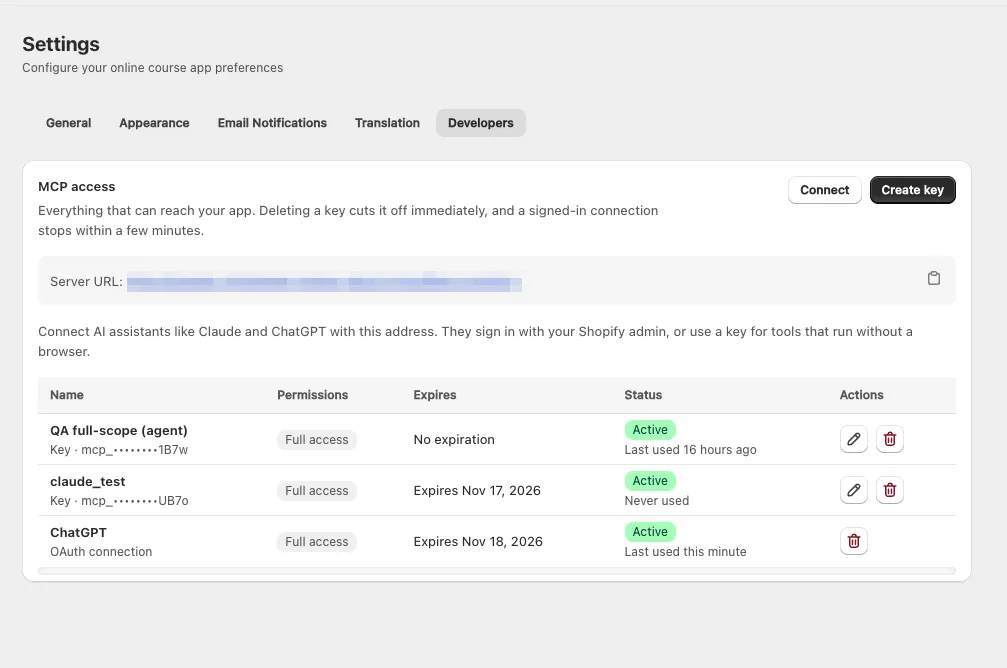
Keys and signed-in connections share one table, so you can see everything that can reach your app in one place. Each row tells you:
- Name — for a key, the name you gave it and the last few characters of its value; for an assistant that signed in, its own name with OAuth connection underneath.
- Permissions — Read only, Full access, or, for a key with some actions switched on, Read + actions with the number of them.
- Expires — the date it stops working. A connection that has already run out says Connection expired here, and one that never finished signing in says Waiting for the assistant to finish signing in.
- Status — Active, Pending or Expired, plus when it last answered. Pending means you approved the assistant but it never came back to collect its access, so nothing is connected yet — connect again from that app.
- Actions — the pencil and bin icons for a key, and only the bin for a connection. There is nothing to edit on a connection: what it may do was decided on the approval screen, so to change it, connect again and approve a different level.
✏️ Change what a key can do
Click the pencil icon on a key to change its name, expiration, or permissions. This takes effect immediately.
🔄 Lost the key, or want a fresh one
Open the key with the pencil icon and click Regenerate key, then Confirm regenerate. You get a new value while the name, permissions and expiration stay exactly as they were, so you only have to paste the new key into your assistant.
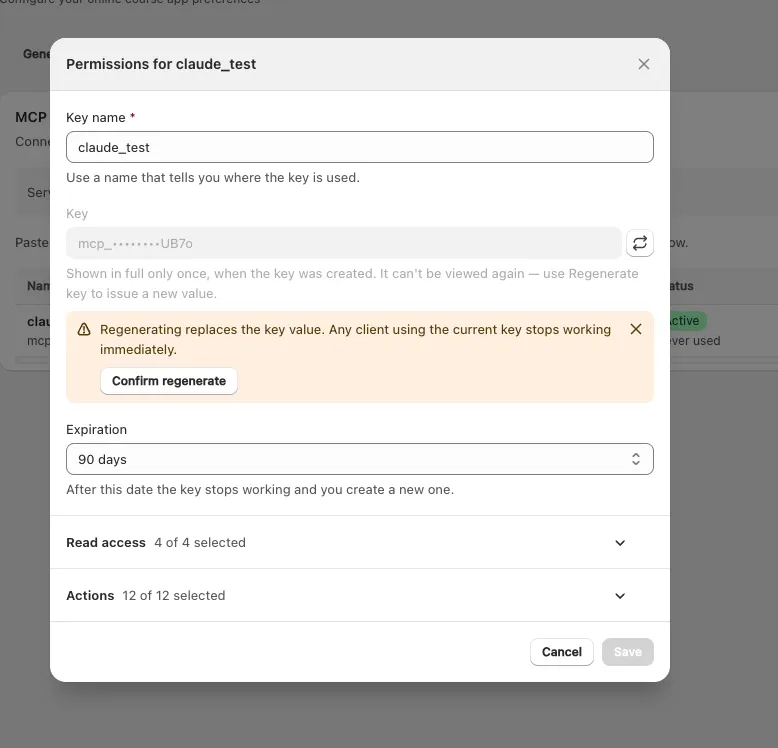
The old value stops working the moment you regenerate. Any assistant still using it will start failing until you paste in the new one.
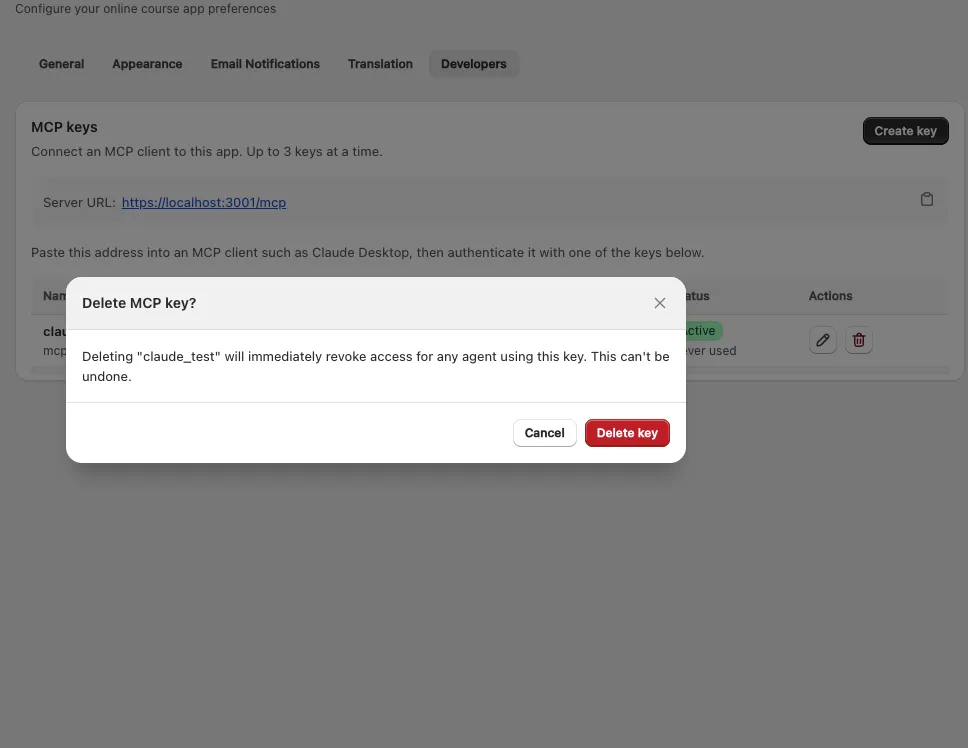
🗑️ Delete a key
Click the bin icon. Deleting a key immediately revokes access for any assistant using it, and cannot be undone.
🔌 Disconnect an assistant that signed in
Click the bin icon on the OAuth connection row. Disconnect OAuth connection? asks you to confirm:
Disconnecting {name} withdraws your approval, so it cannot renew its access. Anything it is still holding stops working within a few minutes, and it will have to ask for your approval again.
Click Disconnect OAuth connection to go through with it, or Cancel to keep it.
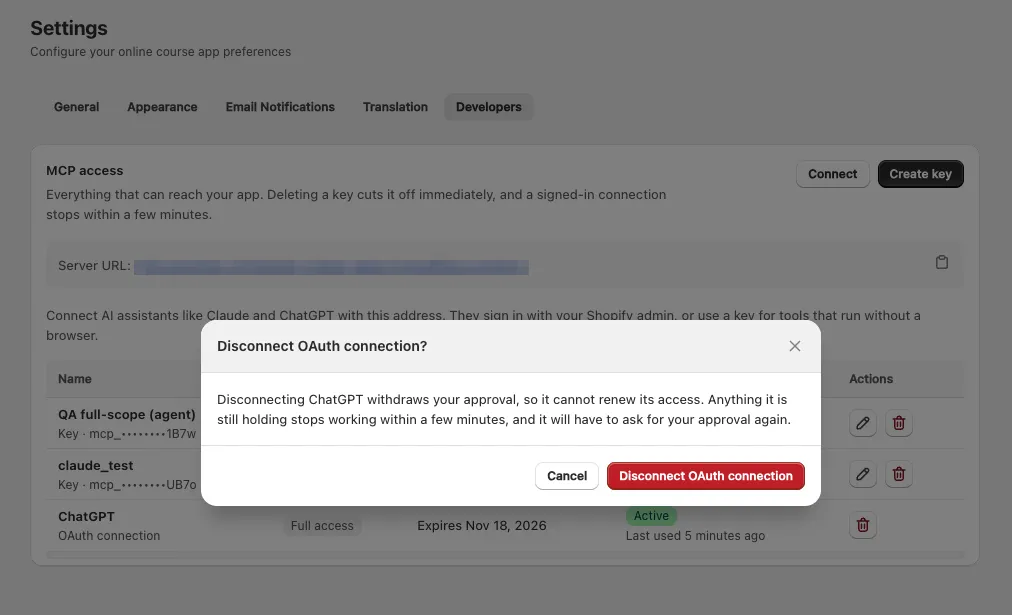
A request the assistant already started can still go through for up to 5 minutes after you disconnect. That is not a fault, and it stops on its own — nothing you do makes it end sooner. If you need access cut off this second, uninstalling the app does it.
To let the same assistant back in, click Connect and go through the approval again.
🤖 What the assistant can do
Read — dashboard statistics, courses, modules, lessons, students and their progress, app settings, and portal translations.
Change — create, update and permanently delete courses, modules and lessons; reorder them; set up a course certificate; add a student to a course; edit the General, Appearance and Notification settings; edit a notification email and send a test of it; edit a portal translation.
An assistant that signed in gets one of those two levels whole. A key can be narrowed much further — every permission is its own switch, and What each permission unlocks lists what each switch turns on, down to the tools it hands over.
Good to know
- The 3-key limit counts keys only. Assistants that signed in through your admin never use up one of those slots, however many of them there are.
- An expired key stops working and is marked Expired in the table. Expired keys do not count toward your 3-key limit, and cannot be regenerated — change the expiration first, or create a new key.
- A connection that has run out is marked Expired too, and says Connection expired under Expires. Connect again to bring it back.
- A connection marked Pending is a different thing: your approval went through, but the assistant never came back to collect its access, so it has never worked. The permissions on that row are what you approved, not something it is using. Connect again from that app — the approval screen has a minute or so to be completed, so a slow or interrupted sign-in lands here.
- If an assistant tries something it is not allowed to do, the request is refused — it cannot work around its permissions.
- Each key and each connection is limited to 60 requests per minute.
- Some settings can never be changed by an assistant, including your plan and quota, the store timezone and language, and the auto-revoke-on-refund switch.
- An assistant can add a student to a course, but it cannot delete a student, change an enrollment, or reset progress — those stay in your hands.
Related
- What each permission unlocks — every Read access and Action permission, and the tools it grants.
- MCP Desktop Setup — run the server on your own computer, for Cursor and other local MCP clients.
- REST API — the HTTP API behind the same keys, for scripts and integrations.