Connections — Overview
The Connections tab is where you manage your platform connections and the pixels firing on your store. Everything about what is tracking lives here; the page also holds the Reconciliation report at the bottom.
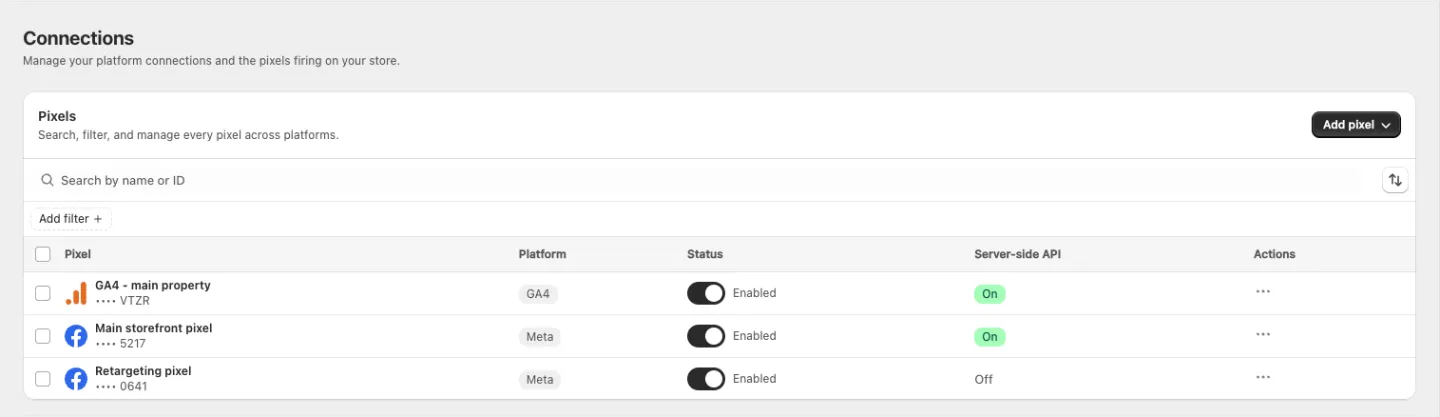
The Pixels table
Each row is one pixel. Search, filter, and manage every pixel across platforms.
| Column | Description |
|---|---|
| Pixel | The pixel's name, with its ID partly masked underneath. Click the row to open the pixel. |
| Platform | Meta or GA4. |
| Status | A toggle showing Enabled or Disabled — your own on/off choice. Flip it right in the row. |
| Server-side API | On or Off — whether conversions are also sent from our server. |
| Actions | The ⋯ menu. |
Finding a pixel
Above the table you get:
- Tabs — All, Meta, GA4, Enabled, Disabled
- Search — Search by name or ID
- Filters — Channel, Status, Server-side API
- Sort — by Name (A–Z / Z–A), Platform, or Status (Enabled first / Disabled first)
If a view has no matches the table reads "No pixels match this view."
Row actions
Open the ⋯ menu on any pixel row for:
- Edit — open the pixel's settings. See Pixel settings.
- Test — jump to Diagnostic with this pixel pre-selected.
- Delete — remove the pixel.
Deleting asks you to confirm: the dialog names the pixel and warns "This stops all tracking through it and can't be undone."
Acting on several pixels
Select the checkboxes and use Enable, Disable, or Delete.
Status vs Token expired
These are two different facts and the table shows both:
- The toggle is your decision — Enabled or Disabled. Nothing else changes it.
- A Token expired badge next to the toggle is a connection problem. Your pixel is still enabled; the platform just stopped accepting the stored login. Reconnect the platform in Settings → Platforms and the badge clears — the pixel resumes exactly as it was.
Empty state
Before you have any pixels the page shows "No pixels yet" — "Choose a platform to add your first pixel - you can add the other anytime." — with a card for each platform:
- Meta — Meta Pixel + Conversions API → Add Meta pixel
- GA4 — Google Analytics 4 → Add GA4 pixel
Adding a pixel
Click Add pixel at the top right and choose Meta pixel or GA4 pixel. See Add a pixel for the full form.
Plans and limits
The free plan includes 1 pixel for your whole store, counting both platforms together. Once you're at the limit the Add pixel button is replaced by 🔒 Contact us to unlimit, which opens the Add more pixels prompt:
"Your plan includes 1 pixel for your whole store. Unlock unlimited pixels to add more."
There's also a channel limit — the free plan runs one channel, so Meta and GA4 at the same time is its own unlock (Run Meta and GA4 together).
Click Contact us to unlock and the app opens chat with our team pre-filled with the request; we unlock it for your store. Nothing is charged inside the app.
Next steps
- Add a pixel — the add-pixel form, field by field
- Pixel settings — edit a pixel, matching, test codes
- Reconciliation — captured vs delivered vs real orders