Tracking
Know which sales your ChatGPT ads bring in. The app sets up your OpenAI pixel, sends every purchase to OpenAI, and shows you whether those purchases arrive.
Open Tracking from the app menu. The page has two tabs:
| Tab | What you do there |
|---|---|
| Setup | Choose your pixel, decide what it sends, and check that events reach OpenAI right now. |
| Health | See how many of your Shopify orders reached OpenAI, and how your tracking performed over time. |
What is the pixel and the Conversions API?
A pixel is a small piece of OpenAI's code that runs on your store. It tells OpenAI when a shopper views a page, views a product or adds to cart. OpenAI uses these events to credit sales to your ads.
The Conversions API sends events from our server straight to OpenAI, instead of from the shopper's browser. It matters most for checkouts and purchases. Those happen in Shopify's checkout, where OpenAI's pixel can't run, so they reach OpenAI only through the Conversions API.
The app uses one event ID for the browser copy and the server copy of the same event. OpenAI keeps the first one it gets, so a sale is not counted twice.
Before you start
- Connect your ChatGPT Ads account with your Ads API key. See Settings.
- Turn on the app embed in your live theme. In the theme editor, open App embeds, turn on Avada ChatGPT Ads pixel, and press Save. Without it, the pixel doesn't load on your store and no browser events are sent. Home's setup guide links straight to it: see Home.
Set up your pixel
Open the pixel card
Go to Tracking → Setup. In the Pixel & Conversions API card, click Choose a pixel.
If the button is missing, the card asks you to connect your account first.
Pick a pixel or create one
The Choose a pixel window lists Pixels in your ad account. Select one and click Use this pixel.
No pixel yet? Under Create a new pixel, enter a Pixel name (or leave it empty and the app names it after your store), then click Create pixel.
Check it worked
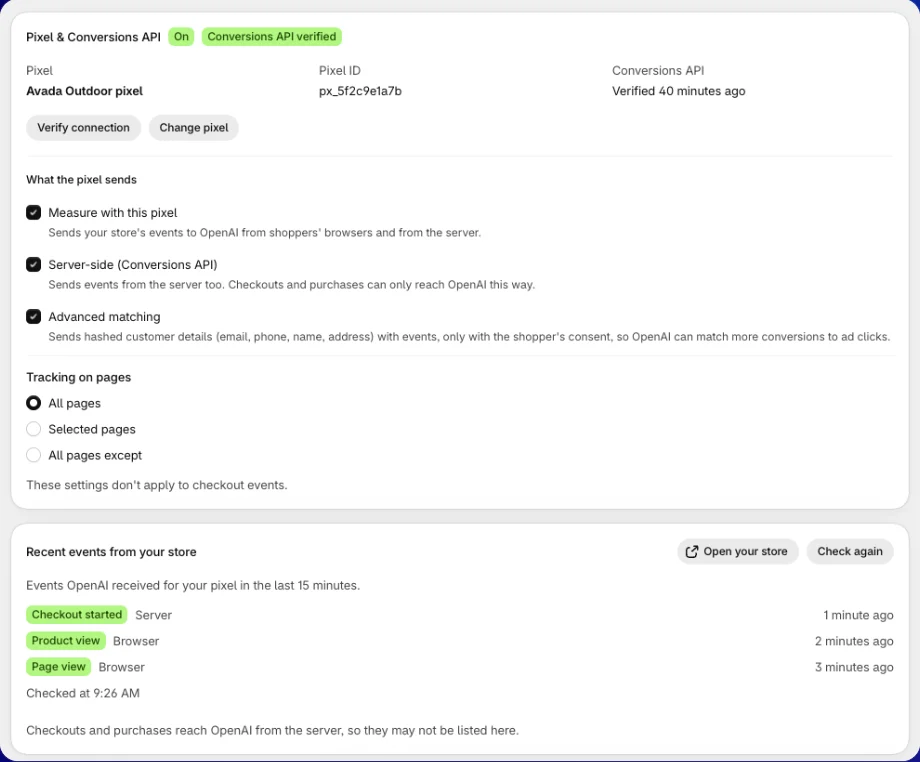
The card shows Pixel ready. OpenAI accepted a test event from its Conversions API key - nothing was recorded. The badges read On and Conversions API verified.
Using a pixel creates a Conversions API key for it and five conversion events in your ad account: page view, product view, add to cart, checkout started and purchase. OpenAI doesn't let apps delete these. You can remove them yourself in Ads Manager.
Only an ad account admin can create a pixel. If your key isn't an admin's, the app shows Only an ad account admin can create a pixel. Create the pixel in Ads Manager (Conversions), then come back and choose it with Reload list and Use this pixel. Or connect an admin's API key. Any key with access to the ad account can choose an existing pixel.
Check the Conversions API
The card shows when the Conversions API was last Verified. Click Verify connection any time to check again. The app sends OpenAI one test event, and nothing is recorded.
| You see | What it means | What to do |
|---|---|---|
| Conversions API verified | OpenAI accepted the test event. Checkouts and purchases are reaching OpenAI. | Nothing. |
| Conversions API not verified | We couldn't confirm the key yet. | Click Verify connection again in a minute. |
| Conversions API refused | OpenAI refused the key. Checkouts and purchases aren't reaching OpenAI. | Fix the key in Ads Manager and verify again, or click Change pixel and set it up again. |
| No Conversions API key | This pixel has no key, so no checkouts or purchases are sent. | Click Set up again. |
To move to another pixel, click Change pixel. If your pixel sits in a different ad account than the one connected, the card warns This pixel belongs to another ad account. It keeps measuring into that account until you choose a pixel from the connected one.
What the pixel sends
Under What the pixel sends, three switches decide what OpenAI gets. Click Save in the save bar after a change.
| Switch | When it's on | When it's off |
|---|---|---|
| Measure with this pixel | Sends your store's events to OpenAI from shoppers' browsers and from the server. | Nothing is sent to OpenAI, from the browser or the server. |
| Server-side (Conversions API) | Sends events from the server too. Checkouts and purchases can only reach OpenAI this way. | Checkouts and purchases aren't sent to OpenAI at all. |
| Advanced matching | Sends hashed customer details (email, phone, name, address), only with the shopper's consent. OpenAI can then match more sales to ad clicks. | Events go without customer details. |
Keep Server-side (Conversions API) on. Without it, OpenAI never hears about a purchase, so your ads look like they sell nothing.
Tracking on pages
Choose where on your store the pixel runs:
- All pages: the default.
- Selected pages: pick the Pages to track.
- All pages except: pick the Pages to skip.
Page types you can pick: Home page, Product page, Collection page, All collections page, Cart page, Search results, Static page, Blog index, Blog post and Not found (404). Select at least one page, or track on all pages.
These settings don't apply to checkout events. Checkouts and purchases are sent whichever pages you pick.
If you see Your storefront hasn't picked up the change, your change is saved but shoppers still get the old settings. Click Retry.
Tracking events, order value and attribution
Lower on the Setup tab are three settings sections. Save them with the same save bar.
Tracking events
Choose which shopping steps are sent to ChatGPT Ads, and whether each goes from the shopper's Browser, the Server, or both.
| Funnel event | Browser | Server |
|---|---|---|
| Page view | ✅ you choose | ✅ you choose |
| View product | ✅ you choose | ✅ you choose |
| Add to cart | ✅ you choose | ✅ you choose |
| Begin checkout | — | ✅ always on |
| Purchase (Core) | — | ✅ always on |
Begin checkout and Purchase show Server only. They happen in Shopify's checkout, where OpenAI's pixel can't run, so the server is their only way to OpenAI.
Order value
Choose what counts in the value of each purchase sent to OpenAI:
- Include shipping: adds shipping to the purchase value.
- Include tax: adds tax to the purchase value.
The value is always sent in the currency the order was placed in. The app never converts between currencies.
Attribution
On the conversion events the app creates in your ad account, ChatGPT Ads credits a purchase to an ad when it happens within 30 days of a click. An event you created earlier in Ads Manager keeps the window you set there.
The Purchase check window is the app's own setting: 1 day, 7 days (recommended) or 28 days. It sets how far back the Health tab compares purchases OpenAI received with your Shopify orders. It doesn't change what OpenAI credits.
Check events are arriving
Recent events from your store lists the events OpenAI received for your pixel in the last 15 minutes, newest first. Each row says whether it came from the Browser or the Server. Click Check again to refresh.
To send a test event:
Open your store
Click Open your store. Accept the cookie banner, if you have one.
Act like a shopper
View a product and add it to the cart.
Come back and check
Return to the app and click Check again. You should see Page view, Product view and Add to cart.
| You see | What it means |
|---|---|
| No browser events in the last 15 minutes. The app embed is off in your published theme... | The pixel can't load. Click Open theme editor, turn on the app embed, and save. |
| The pixel is turned off, so no events are sent. | Turn on Measure with this pixel. |
| OpenAI doesn't share recent events for this ad account... | This is about the account, not your store. See events in Ads Manager under Conversions. |
| We couldn't check recent events. | The check failed. This doesn't mean nothing arrived. Try again in a minute. |
Checkouts and purchases reach OpenAI from the server, so they may not be listed here. To confirm purchases, use the Health tab.
Check your purchases reach OpenAI (Health tab)
Go to Tracking → Health. The first card, Purchases OpenAI received, answers one question: did OpenAI get my sales?
It compares the purchases the Conversions API delivered to OpenAI with the orders Shopify recorded, over your Purchase check window. The headline gives the share and reads OpenAI received X of Y Shopify orders. The share turns green at 95% or more.
| Figure | What it means |
|---|---|
| Recorded by the app | Purchases the app tracked. |
| Recovered from the Shopify order | Purchases the pixel didn't see, which the app picked up from the Shopify order instead. |
| Missed (found in Shopify only) | Orders in Shopify that the app never tracked. |
| OpenAI accepted X of Y purchase sends | How many purchase sends OpenAI accepted. |
Not counted yet lists orders still waiting for Shopify to confirm them. Click Refresh to read the card again.
If the card shows No purchase can reach OpenAI, the Conversions API is off. Turn on Server-side (Conversions API) on the Setup tab.
Pixel analytics
Under the purchase check, Pixel analytics shows how tracking performed. Pick a Date range (Last 7 days, Last 30 days or Last 90 days) and click Refresh.
- Issues & fixes: problems the app found, each with a fix and a link to where you fix it.
- Overview: Events tracked, Purchases tracked, Revenue tracked, Average order value and Conversion rate, compared with the previous period.
- Accuracy: how many of your real Shopify orders the app captured.
- Conversions API delivery: the share of server events OpenAI accepted, with a status such as Healthy, Failing or No traffic.
- Daily activity and Event activities: events each day or each hour. A flat line where you expect traffic is the first sign tracking stopped.
- Funnel: events at each shopping step, from page view to purchase.
- Pixels: what your pixel captured in the range.
Revenue taken in more than one currency is shown as a plain total and named as such. It is never converted. When the app can't read a number, it says so, rather than showing zero.
Shopper consent
The app respects each shopper's choice in your cookie banner:
- Marketing consent first. OpenAI's pixel loads only after the shopper allows marketing cookies. The server applies the same choice before sending an event.
- Sale-of-data opt-out. If a shopper has opted out of the sale of their data, their events are not sent to OpenAI.
- Withdrawal. If a shopper withdraws consent, the pixel stops sending and OpenAI's cookies are removed.
- Analytics only. A shopper who allows only analytics cookies is counted in the app's own reports, but nothing about them is sent to OpenAI.
One exception: a purchase the app recovers from the Shopify order carries no cookie-banner choice. An order from the EEA, the UK or Switzerland is then sent only when the cart recorded the shopper's marketing consent. An order whose cart recorded an opt-out of the sale of data is never sent.
FAQs
Why don't I see purchases in Recent events?
Purchases and checkouts reach OpenAI from the server, not the shopper's browser, so the list may not show them. The list also covers only the last 15 minutes. To confirm purchases, open Tracking → Health and check Purchases OpenAI received.
Do I need a cookie banner?
It depends on where you sell. The app follows the choice your Shopify cookie banner records: OpenAI's pixel loads only after a shopper allows marketing cookies. If your store asks for consent, shoppers who don't accept marketing cookies send nothing to OpenAI.
Can I use the pixel I already have?
Yes. Click Choose a pixel (or Change pixel), select your pixel under Pixels in your ad account, and click Use this pixel. The app adds a Conversions API key and the five conversion events to it.
Why can't I create a pixel?
Only an ad account admin's API key can create one. Create the pixel in Ads Manager under Conversions, then choose it in the app. Or connect an admin's key in Settings.
What happens to tracking if I disconnect my account?
Your pixel keeps measuring. It sends events with its own Conversions API key, which stays active. To stop measuring, turn off Measure with this pixel on the Setup tab.
Does the Purchase check window change how OpenAI credits sales?
No. It only sets how far back the app compares purchases with your Shopify orders. OpenAI credits a purchase within 30 days of a click on the events the app creates.
I see no events at all. What should I check?
First, check the app embed is on in your live theme. Then check Measure with this pixel is on. Then open your store, accept the cookie banner, view a product, and click Check again.
Still have questions?
Chat with us from the app, any time.