Connect an AI assistant (MCP)
Instead of opening every feed to find what Google rejected, ask your AI assistant and get the answer with real numbers from your store.
What is MCP?
MCP (Model Context Protocol) is the standard way to plug an AI assistant into an outside app. Once connected, the assistant can look at your feeds for one store, and, if you allow it, sync or publish them.
Once connected you can ask things like:
- "Which products in my US feed are disapproved, and why?"
- "Give me a health summary of all my feeds."
- "What are the top 3 issues in my Germany feed, and how do I fix them?"
- "Sync my US feed, then refresh its approval status."
- "Create a Google feed for Canada in English with all products."
You'll find it in the app under MCP Server.
Pick your assistant
| Assistant | How it connects | Where to start |
|---|---|---|
| Claude | One click, details filled in for you | Open your client → Claude |
| ChatGPT | One click, then paste the link | Open your client → ChatGPT |
| Gemini, Grok | Opens their connector page, then paste the link | Open your client → Gemini or Grok |
| Claude Code, Cursor CLI and other terminal agents | Paste one prompt | Quick connect for terminal agents |
| Anything else | Paste the link by hand | Add it by hand |
Where to find your connection link
Every setup starts here.
Open the MCP Server page
In the Avada Product Feed app menu, click MCP Server.
Copy the link
Find MCP Server URL and click the field to copy it. This is the link you give your assistant.
Below it, Client ID shows your .myshopify.com domain. Most assistants never ask for it.
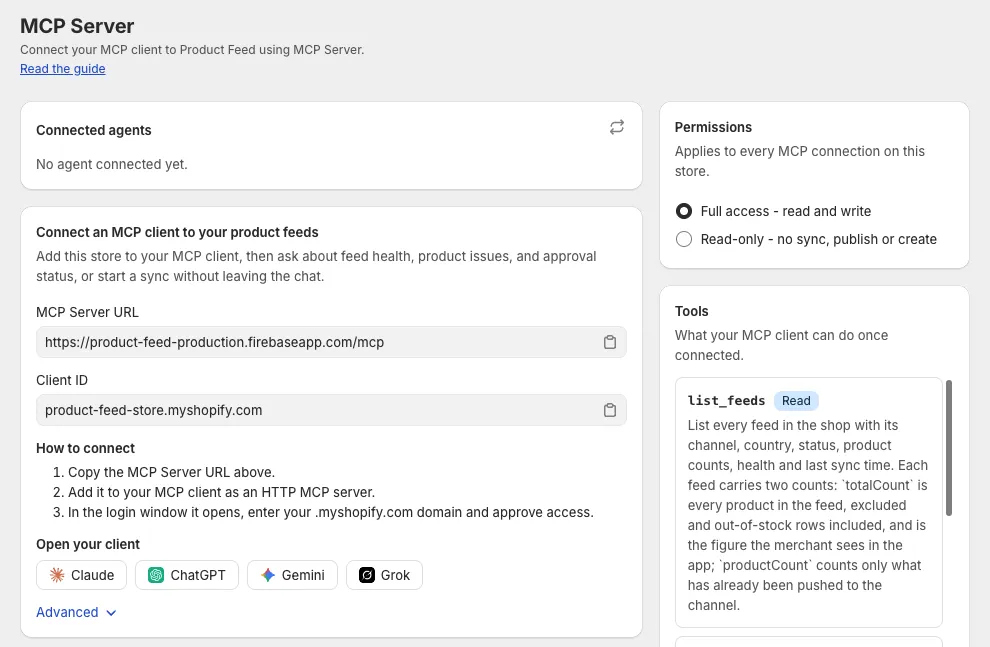
The link works for one store. If you run several stores, connect each one from its own app.
Connect Claude, ChatGPT, Gemini or Grok
Open your assistant
Under Open your client, click the tile for your assistant. It opens in a new tab.
- Claude opens its add connector screen with the name and link already filled in. Check them and confirm.
- ChatGPT opens its create connector screen. Turn on Developer mode in ChatGPT's settings first, then paste the MCP Server URL.
- Gemini and Grok open their apps or connectors page. Add a custom connector there and paste the link.

Sign in to your store
A sign-in window opens. Enter your store domain, such as my-store.myshopify.com, and click Continue. Already signed in? Click Continue as and your store name. Sign in with Shopify if asked.
Review and approve
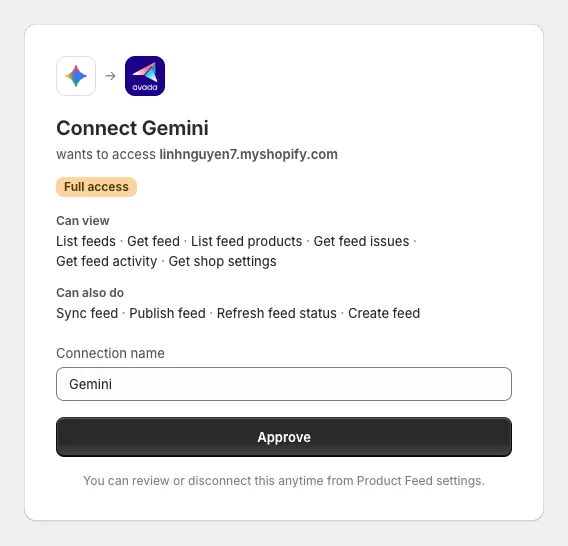
The approval page shows a Full access or Read-only access badge, a Can view list and, with full access, a Can also do list. Rename the connection in Connection name if you like, then click Approve.
Check it worked
Back on the MCP Server page, your assistant now shows under Connected agents. Don't see it? Click the refresh icon on that card. Then start a new chat and ask "List my feeds."
Add it by hand
Use this for any other assistant that allows custom connectors.
Copy the link
Copy the MCP Server URL from the MCP Server page.
Add a new connection in your assistant
Open your assistant's settings and find the place to add a new connection. It may be called Connectors, Apps or MCP servers. Paste the link there and save.
Sign in and approve
Sign in with your store domain and click Approve, the same as above.
If your assistant asks for a client ID, paste the Client ID. If it also asks for a client secret, click Advanced → Generate secret, then copy the Client secret.
Treat the client secret like a password. Paste it only into your assistant's settings, never into a chat, a shared file or a screenshot.
Connect a terminal agent
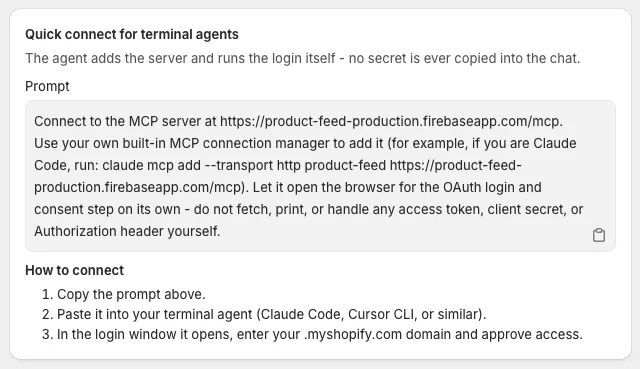
For Claude Code, Cursor CLI and similar tools, use the Quick connect for terminal agents card. No secret is copied into the chat.
Copy the prompt
Click the Prompt field to copy it.
Paste it into your terminal agent
The agent adds the connection and opens a login window by itself.
Approve
Enter your .myshopify.com domain and click Approve.
What your assistant can do
Your choice under Permissions decides whether it can only look, or also act.
| Full access - read and write | Read-only - no sync, publish or create | |
|---|---|---|
| List your feeds, and open one with its products, approval status and health | ✅ | ✅ |
| List a feed's products, 100 at a time, filtered by status or searched by name | ✅ | ✅ |
| Explain a feed's issues, with counts, sample products and how to fix them | ✅ | ✅ |
| Show a feed's recent activity and your store settings | ✅ | ✅ |
| Sync a feed and send its products to Google or Meta | ✅ | — |
| Publish a feed | ✅ | — |
| Refresh approval status from Google or Meta | ✅ | — |
| Create a new Google feed | ✅ | — |
A new Google feed starts syncing right away. Ask the assistant to publish it once the sync is done. Create Meta feeds in the app.
Actions go live straight away, with no undo. A sync sends products to your real Merchant Center or Meta catalog. Want answers only? Choose read-only.
Runs started by an assistant show an AI assistant badge in the feed's Activities tab, so you can always tell who did what.
Change the access level
Find the Permissions card
On the MCP Server page, find Permissions.
Pick a level
Choose Full access - read and write or Read-only - no sync, publish or create.
Save
Click Save in the save bar.
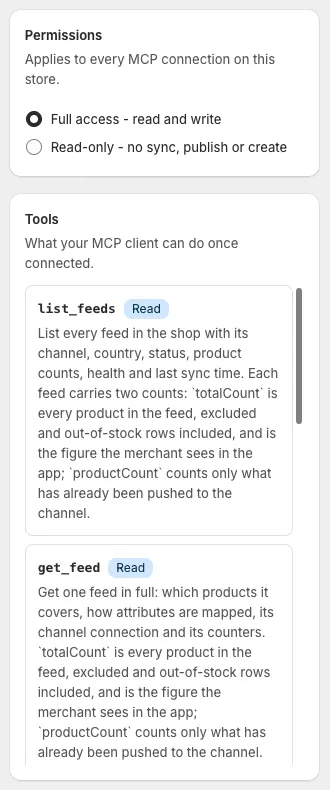
The setting covers your whole store and every connected assistant. The Tools card lists each action with a Read or Write badge. Read-only turns off every Write action.
Disconnect an assistant
Remove one assistant
Find it
Under Connected agents, find the assistant. The table shows Name, Connected and Last active.
Disconnect
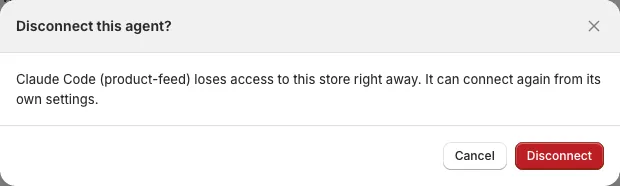
Click Disconnect, then confirm. It loses access right away.

Cut off every assistant at once
Click Advanced, then Revoke or Regenerate secret, and confirm. Every connection stops right away.
- After Revoke, click Generate secret before you connect again.
- After Regenerate secret, each assistant must sign in again.
Also remove the connector in your assistant's own settings, so it stops offering a connection that no longer works.
Troubleshooting
The sign-in window shows an error instead of the approval page
Click Advanced on the MCP Server page, click Generate secret, then connect again.
My assistant doesn't show under Connected agents
Click the refresh icon on the Connected agents card. If it still isn't there, the approval didn't finish. Connect again and click Approve at the end.
ChatGPT won't let me add the connector
Check two things. Your ChatGPT plan must allow custom connectors, and Developer mode must be on in ChatGPT's settings.
The assistant answers questions but won't sync or publish
Your store is set to read-only. Go to MCP Server → Permissions, choose Full access - read and write, and click Save.
The assistant says it has to wait
You hit the hourly limit: 300 look-ups and 20 actions an hour per store. Try again in the next hour.
Does the assistant change my Shopify products?
No. It works on your feeds only. Your Shopify products stay as they are.
Still have questions?
Chat with us from the app, any time. See also Limits and FAQ.