MCP keys
Connect an AI assistant — Claude, ChatGPT, Cursor, or your own agent — directly to your booking data, so it can read your services, packages, appointments, staff and customers, and (if you allow it) make changes on your behalf.
There are two ways in. Claude and ChatGPT sign you in with your Shopify admin account, so there is nothing to copy. Everything else takes an MCP key you create here and paste into the assistant — which is also the only option for tools that run without a browser.
You can have up to 3 at a time, counting both keys you create here and assistants that signed in themselves.
🔑 Create a key
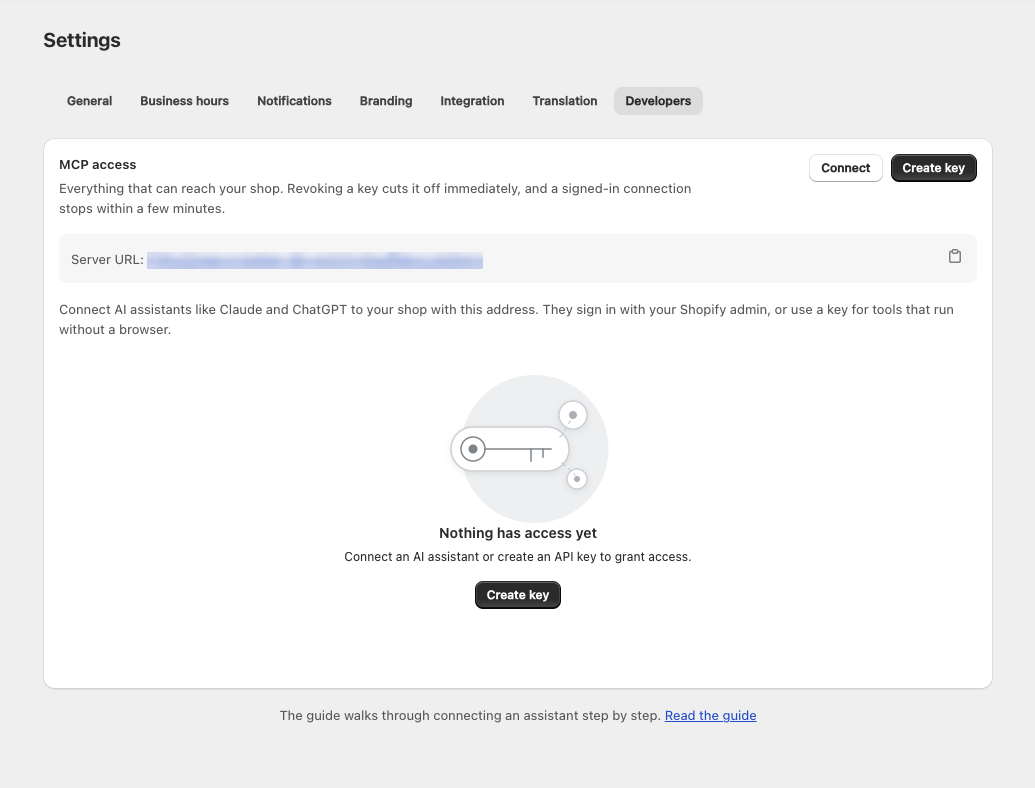
- Open the app > click Settings > Developers
- Click Create key
- Give the key a name that tells you where it is used — for example
Claude DesktoporSupport agent - Choose an expiration: 30, 90, 180 days, or no expiration
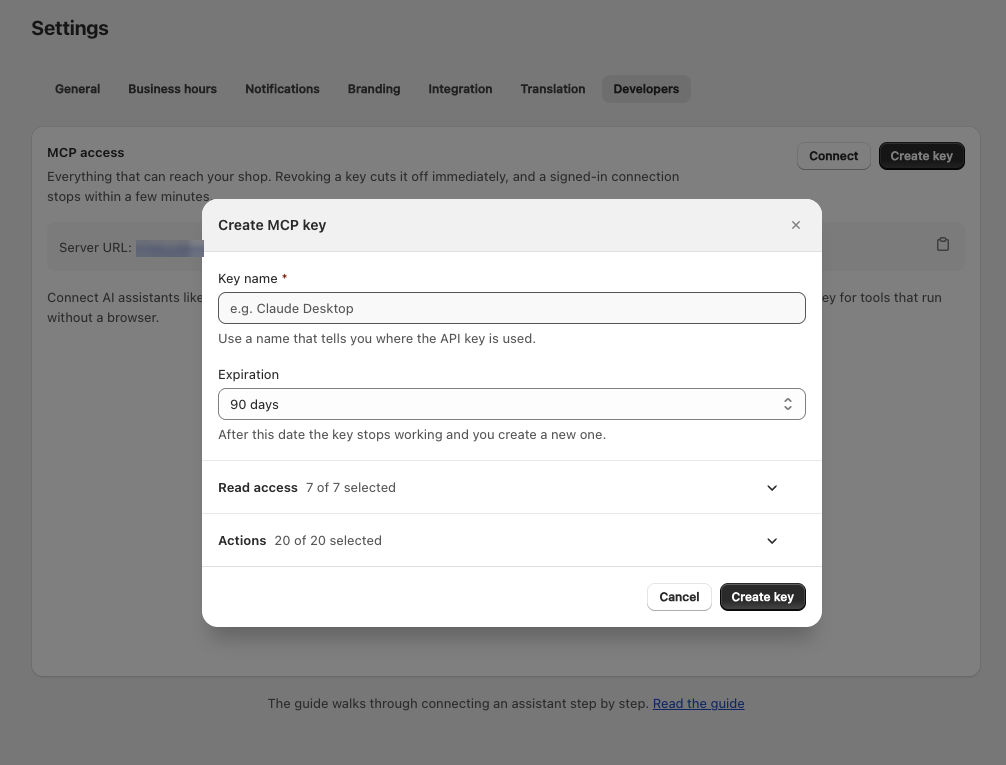
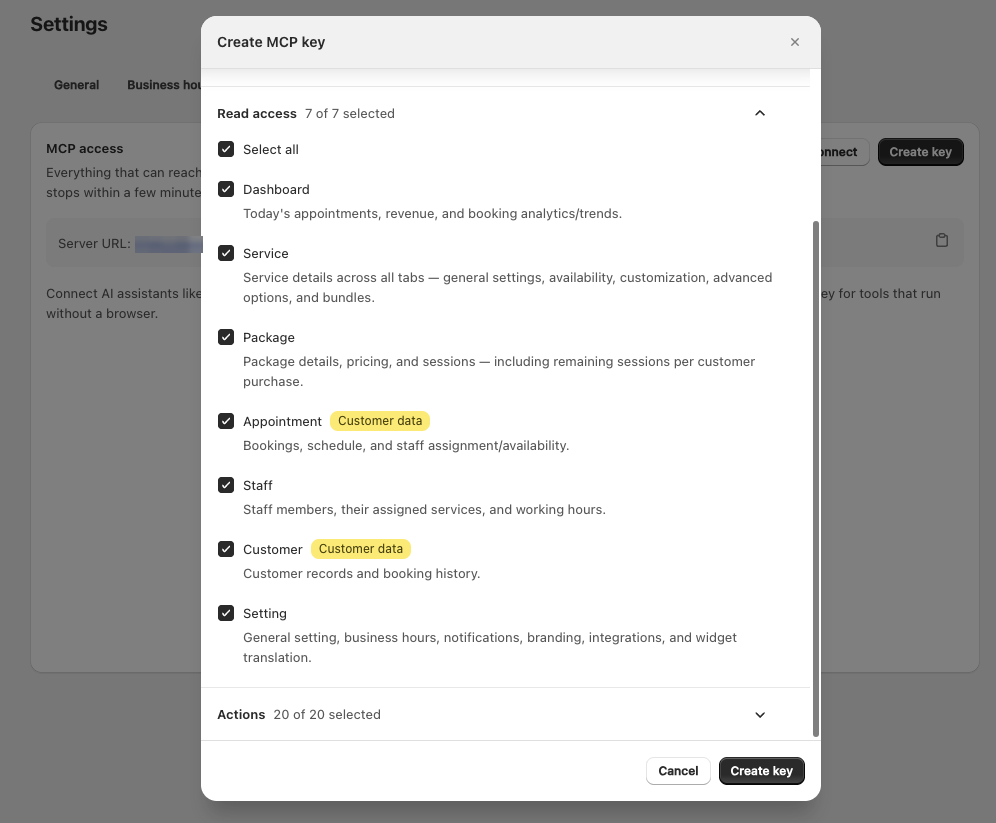
- Choose what the key may do. Both groups start fully switched on — open them and turn off anything this assistant does not need. What each permission unlocks lists exactly what you are granting.
Read access — the areas the assistant may look at.
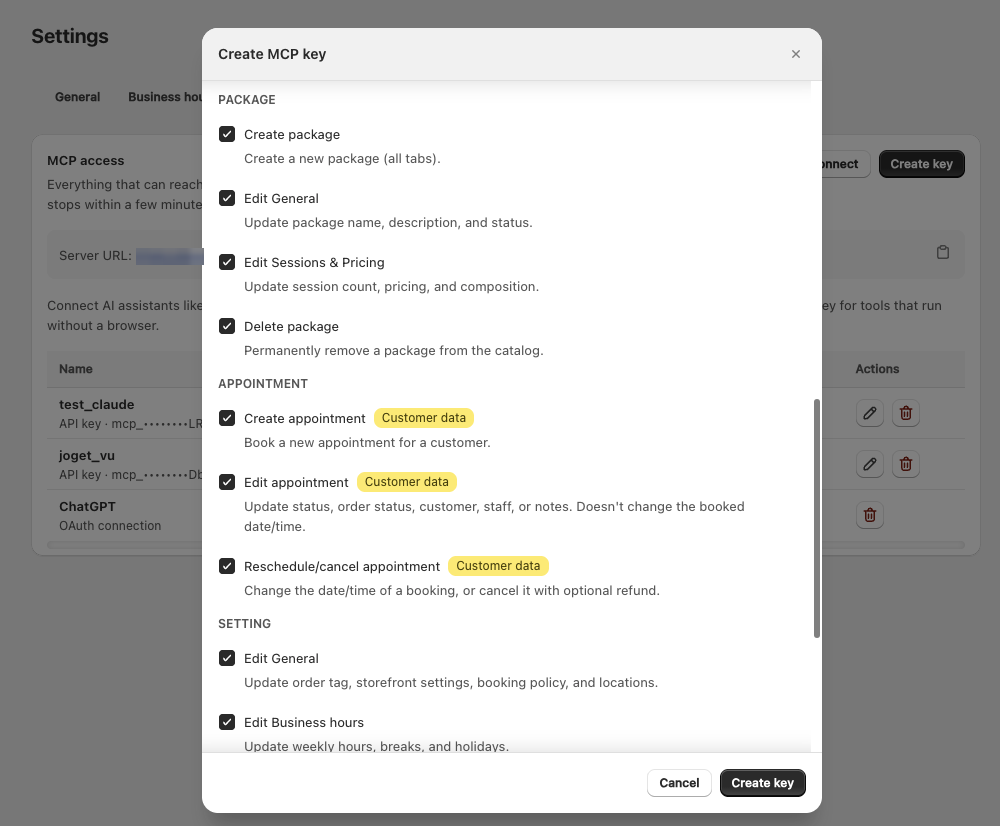
Actions — the 20 changes it may make, grouped by Service, Package, Appointment, and Setting. These change live data, so be deliberate here.
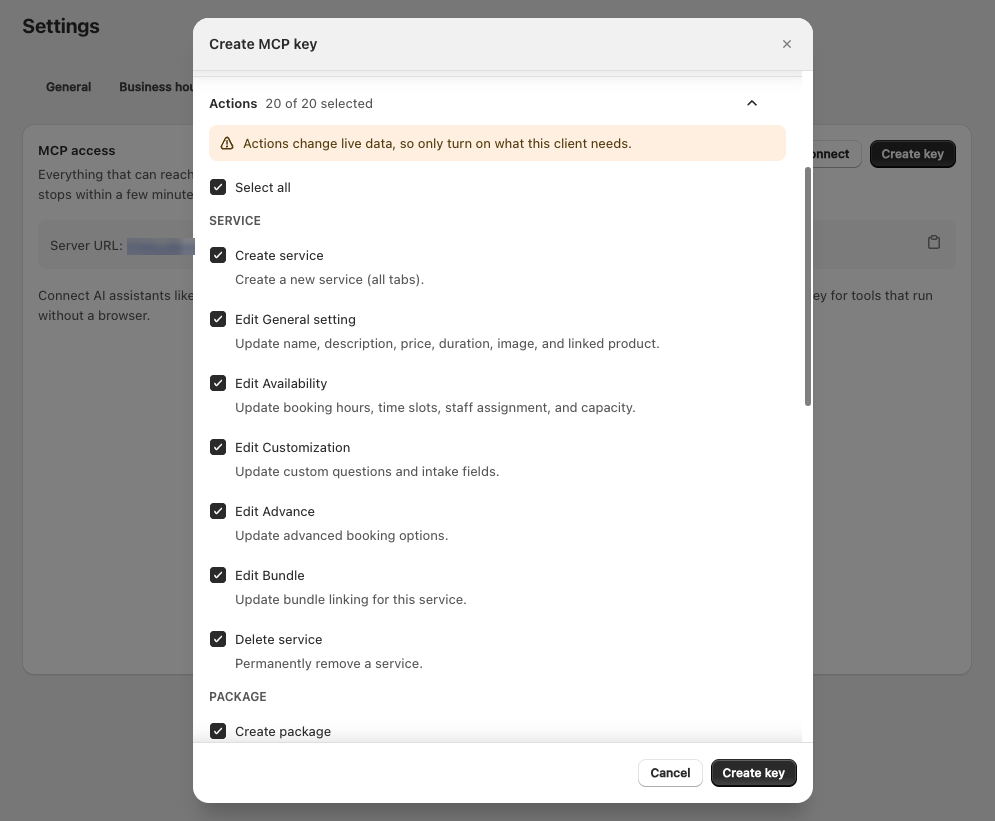
Scroll on for the Package and Appointment groups:
and Setting, the last one:
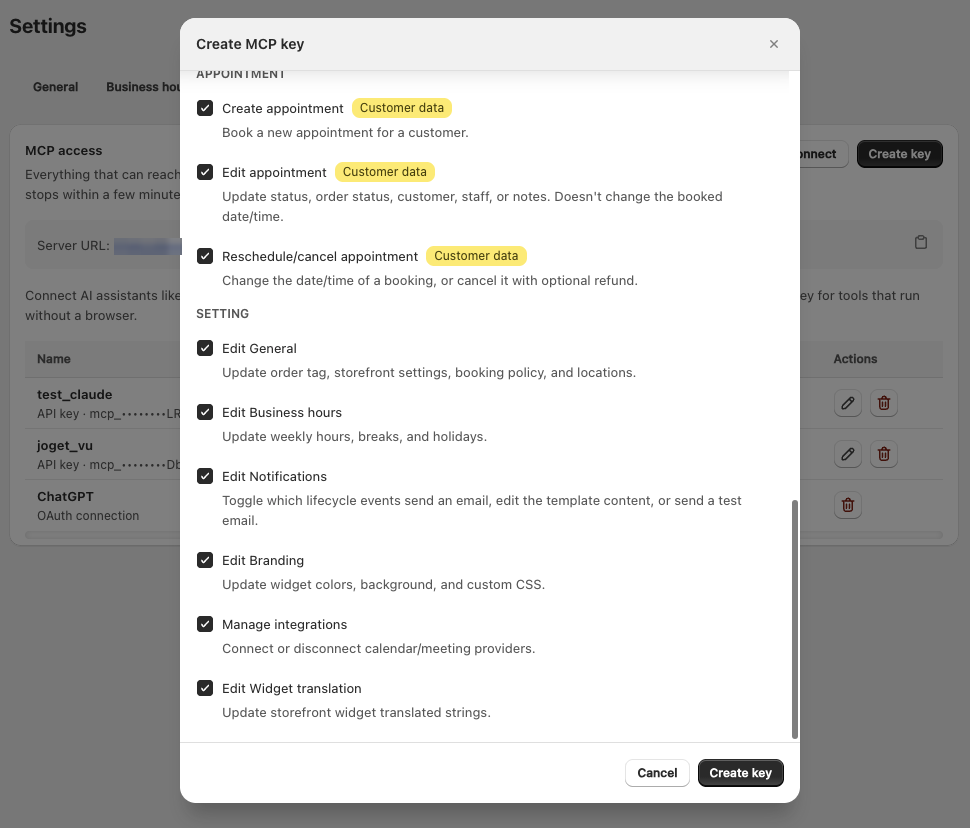
Permissions marked Customer data give the assistant access to customer names, emails, and booking history.
- Click Create key
📋 Copy the key
The key value is shown once, right after you create it. Copy it, or use the download icon to save it as a text file, then tick I've saved this key somewhere safe.
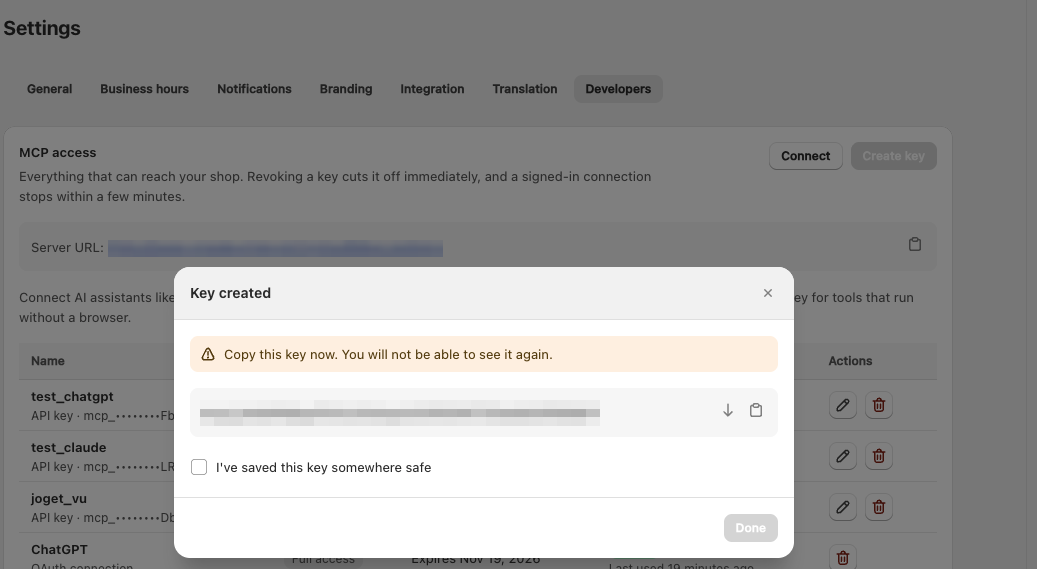
Nobody can look this value up again — not you, and not Avada support. Only a fingerprint of the key is stored, never the key itself. If you lose it, you'll have to regenerate it.
🔌 Connect your assistant
Every assistant needs the Server URL, shown on the Developers page with a copy button. How it proves who it is depends on the assistant:
| Claude (claude.ai, Claude Desktop) | Signs you in — no key needed |
| ChatGPT | Signs you in on the Plugins form; the Connectors form takes a key instead |
| Claude Code, Cursor, your own agent | Send the mcp_... key as a header |
| Assistants that cannot reach the web (Codex, LM Studio, self-hosted agents) | Run the connector on your own computer — see Run the connector on your machine |
Click Connect on the Developers page for the same steps at a glance.
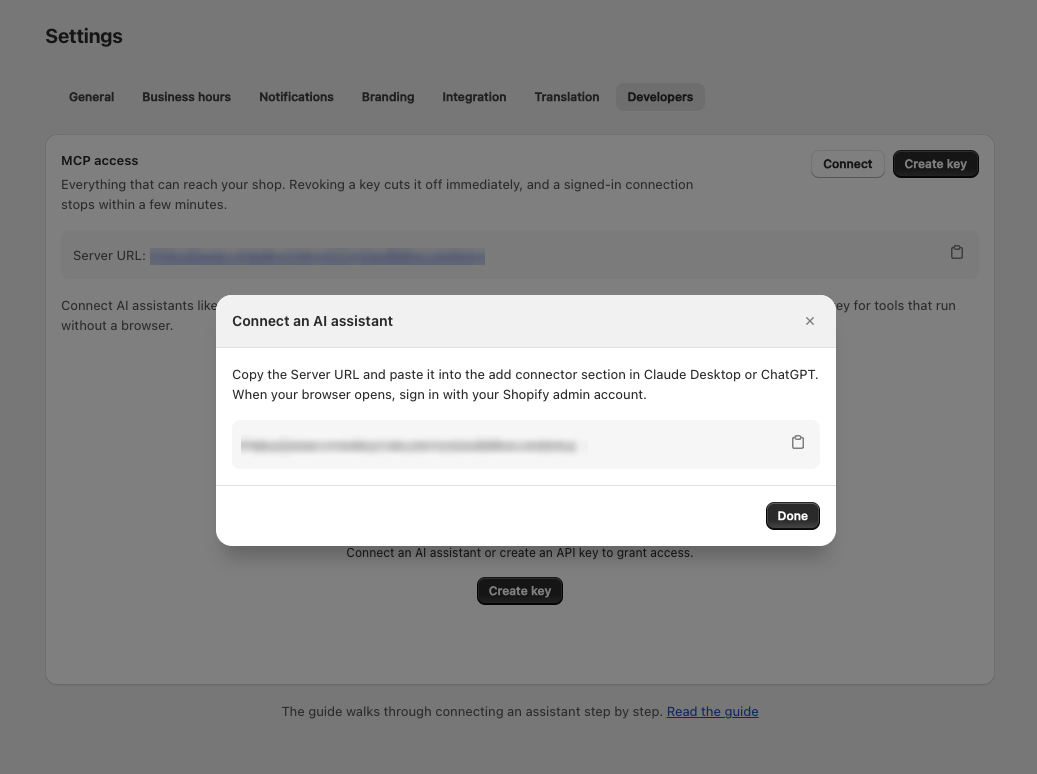
Claude — sign in, no key
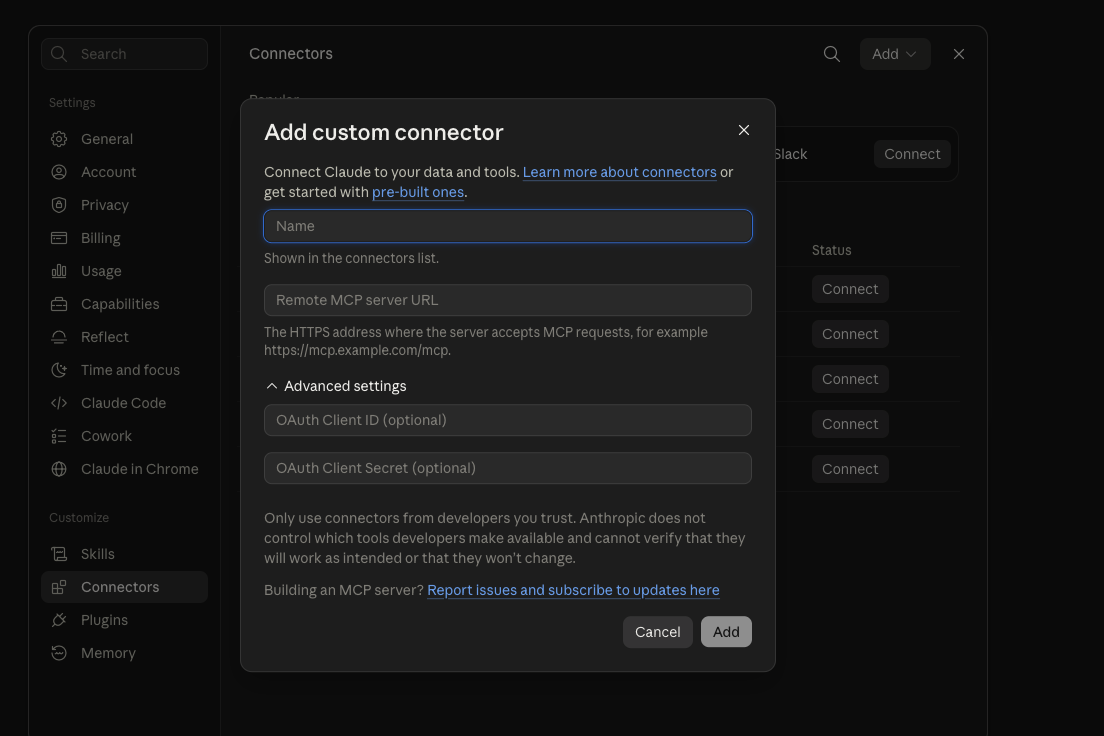
- Open Settings → Connectors and click Add custom connector
- Paste your Server URL. Leave OAuth Client ID and Client Secret empty — the server hands those out on its own
- Click Add, then Connect
A browser tab opens asking which store you're connecting, then Shopify asks you to approve — this is where you choose read-only or full access, and how long the connection lasts. Approve, and the tab returns to Claude.
ChatGPT
ChatGPT has two forms for adding an MCP server, and which one you get depends on your account.
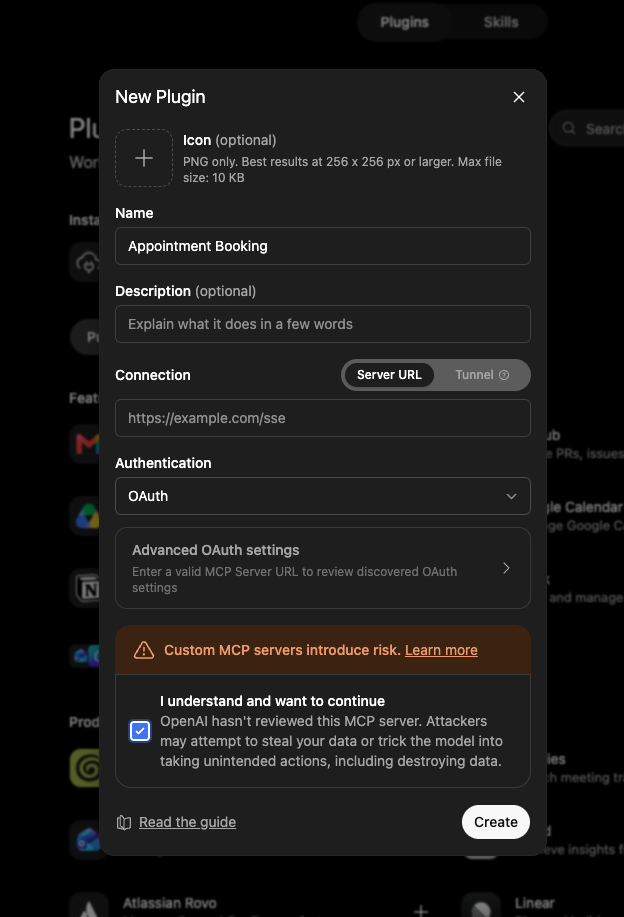
Plugins — the easier one. Paste your Server URL and pick OAuth as the authentication. There is no key to create: ChatGPT asks Shopify for access itself, the same way Claude does.
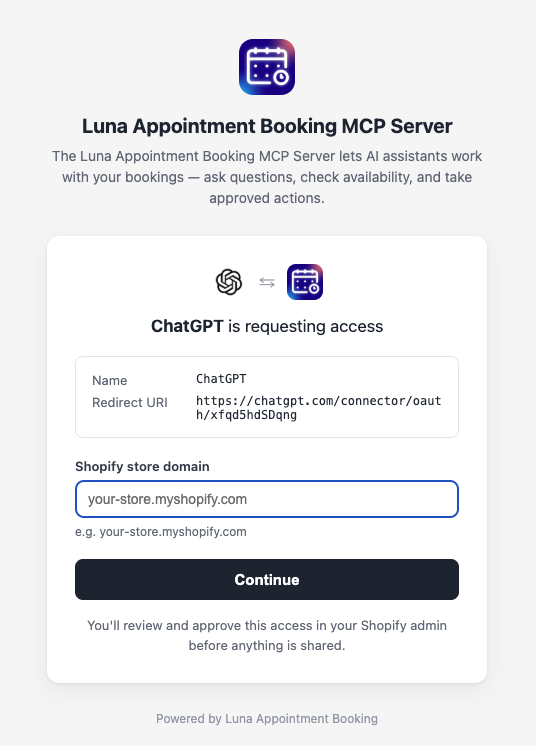
A browser tab opens asking which store you are connecting:
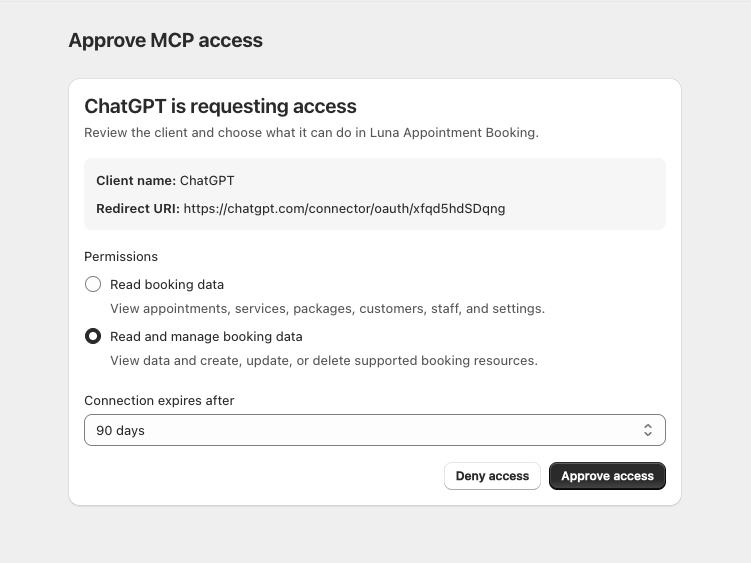
Then the approval screen — this is where you choose read-only or full access, and how long the connection lasts:
Approve, and the connection shows up in ChatGPT's own list:
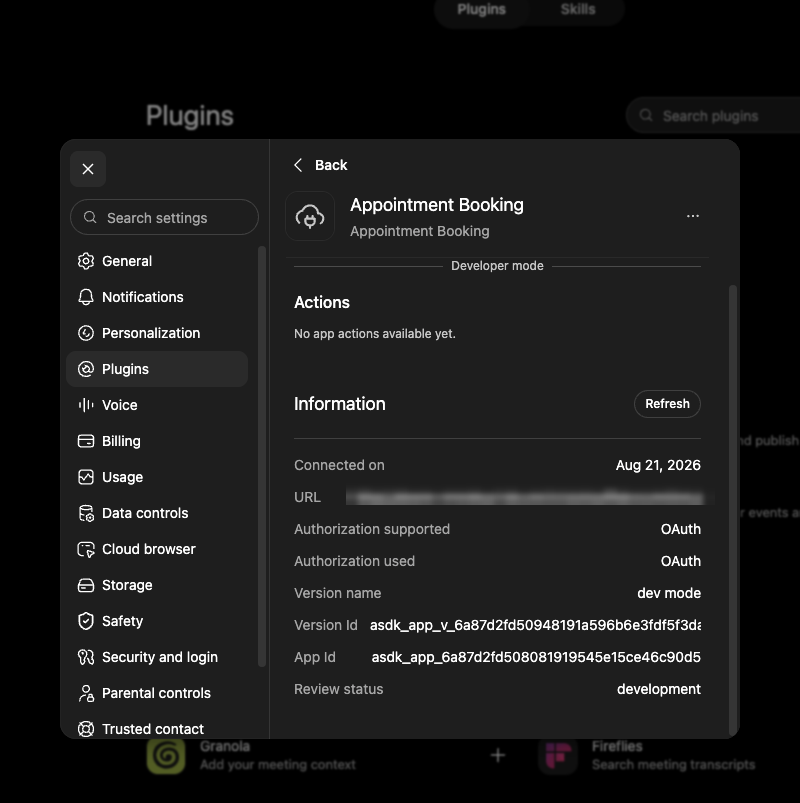
Connectors — the other form takes a key in a header rather than a sign-in:
| Type | Streamable HTTP |
| URL | your Server URL |
| Header | Authorization = Bearer <your key> |
Claude Code
claude mcp add --transport http luna \
  <your server URL> \
  --header "Authorization: Bearer <your key>"
Cursor and other MCP clients
Add an HTTP MCP server pointing at your server URL, and send the key as an
Authorization: Bearer <your key> header.
👀 Connections you signed in to
An assistant you signed in to appears in the same table as your keys, labelled OAuth connection.
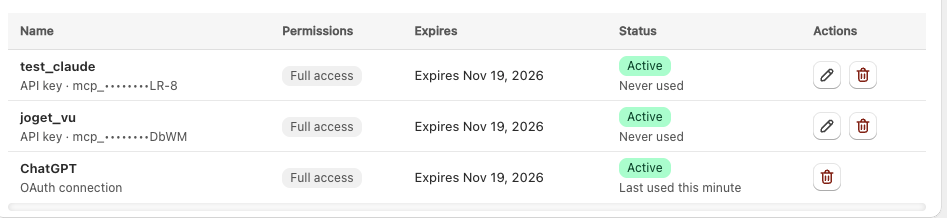
It has a bin icon but no pencil, and that is deliberate: those permissions are what you granted the assistant on the approval screen. Changing them here would leave the assistant believing it still has access it no longer has, with no way for us to tell it otherwise. To change what it can do, revoke the connection and connect again — you'll be asked to approve the new permissions.
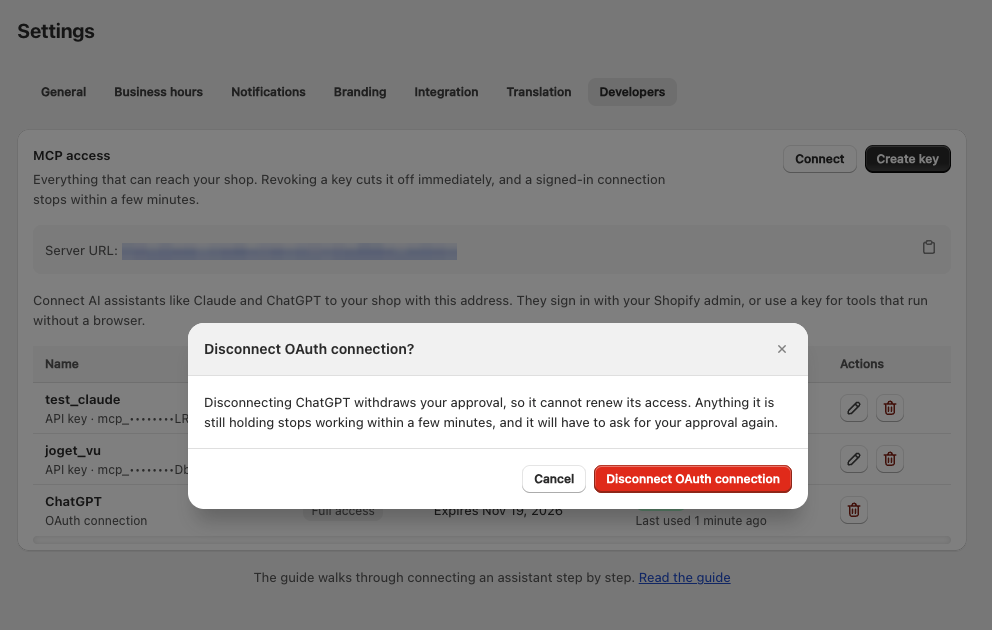
Revoking withdraws your approval, so the assistant can no longer renew its access. Anything it is still holding keeps working for a few more minutes and then stops — unlike a key, which is cut off the moment you delete it.
Your assistant may keep showing the connection as active afterwards. It only finds out the next time it tries to use it — nothing tells it sooner. Disconnect it on that side too if you want the list tidy.
✅ Check it works
Ask your assistant something simple, like "How many appointments do I have this week?".
Back in Settings > Developers, the line under the key's Status badge changes from Never used to the time it last answered. That is the quickest way to tell a key is really working.
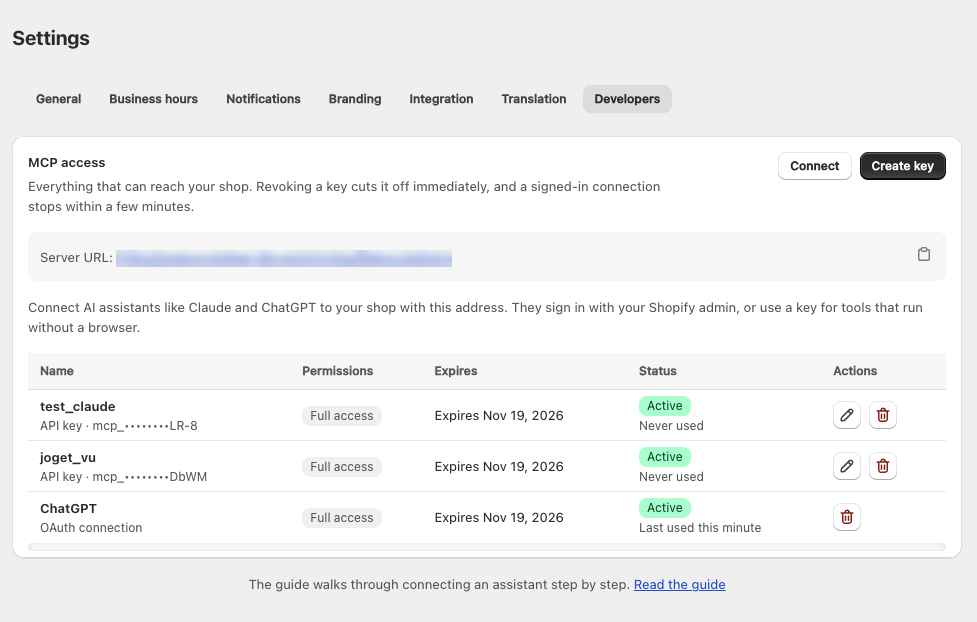
✏️ Change what a key can do
Click the pencil icon on a key to change its name, expiration, or permissions. This takes effect immediately. Connections you signed in to have no pencil — see above for why.
🔄 Lost the key, or want a fresh one
Open the key with the pencil icon and click the regenerate icon next to the Key field, then Confirm regenerate. You get a new value while the name, permissions and expiration stay exactly as they were, so you only have to paste the new key into your assistant.
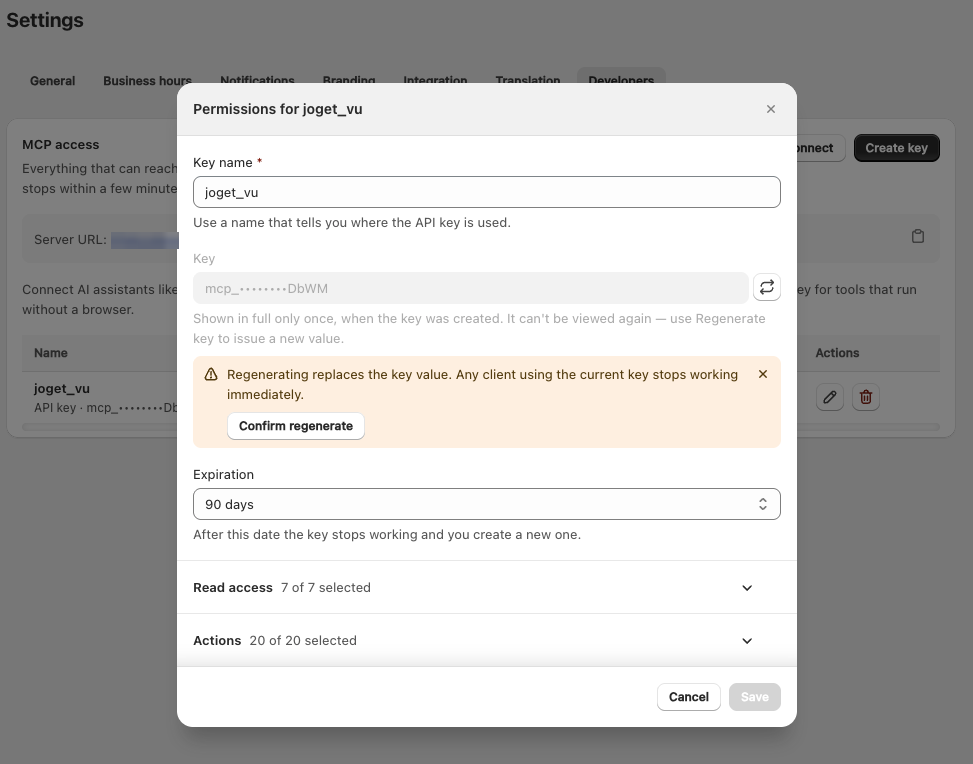
The old value stops working the moment you regenerate. Any assistant still using it will start failing until you paste in the new one.
🗑️ Delete a key
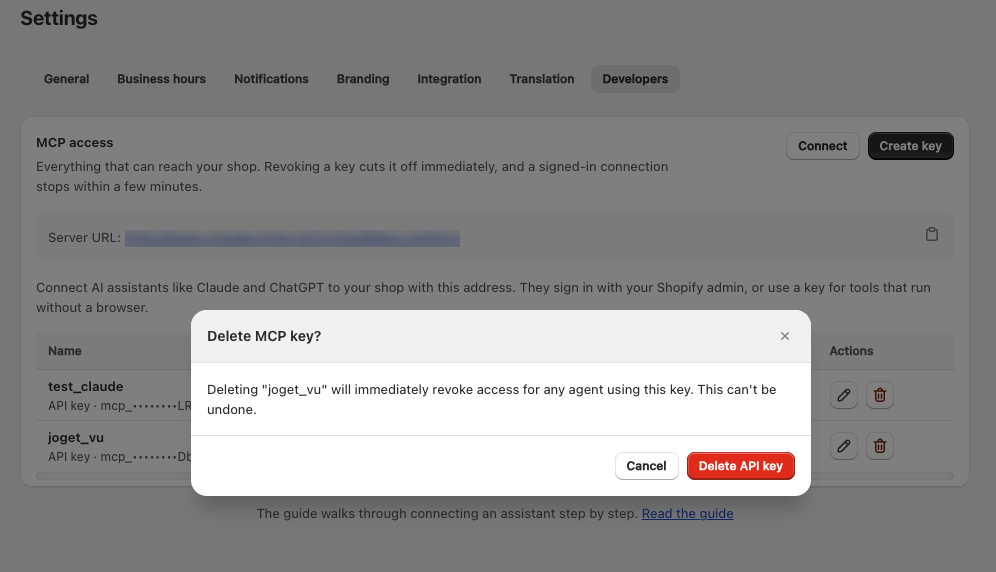
Click the bin icon. Deleting a key immediately revokes access for any assistant using it, and cannot be undone.
⌛ When a key expires
A key past its expiration stops working and is marked Expired.
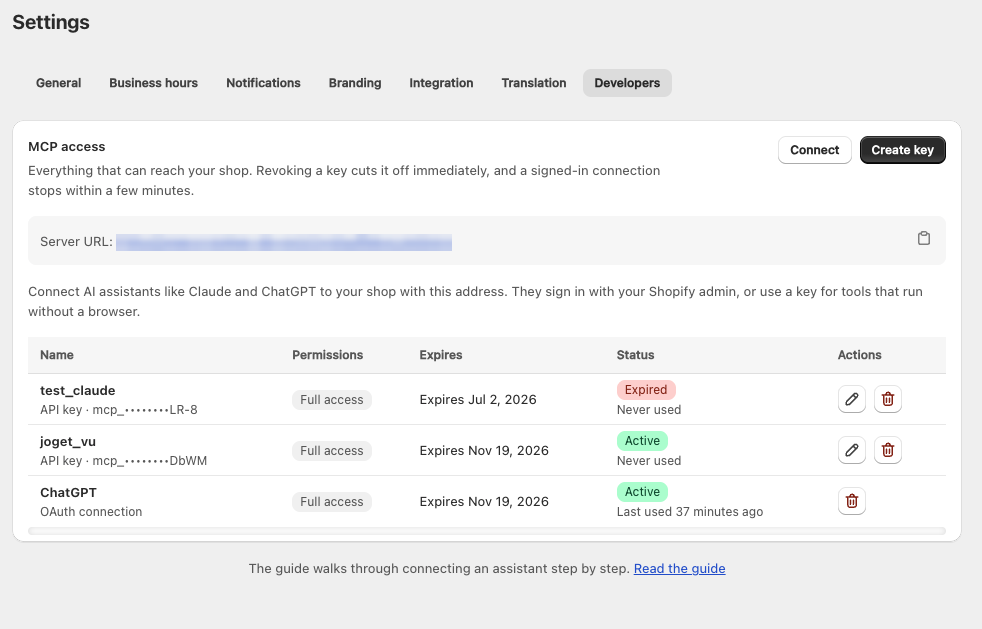
It no longer counts toward your 3-key limit, and it cannot be regenerated — open it with the pencil icon and give it a new expiration first, or just create a new key.
Good to know
- If an assistant tries something it is not allowed to do, the request is refused — it cannot work around its permissions.
- A connection you signed in to expires on the date you picked on the approval screen — 30, 90 or 180 days from when you approved it. Using it does not push that date back; when it passes, the assistant stops and asks you to approve again.
- Each key is limited to 60 requests per minute.
- Every date and time is wall-clock in your store's timezone, not UTC — "10am Friday" means 10am as your staff read it, wherever the assistant is running.
- Anything an assistant can do here is also a plain HTTP call with the same key, if you would rather script it — see the REST API.
- Some fields can never be changed by an assistant, including package pricing totals, order links on appointments, and your SMTP credentials.