How to block each kind of tracker
Not every tracker on your store is blocked the same way, and a few are not blocked by Cookie Bar at all. Which method you need depends on how the tracker was installed.
Start with the table below, then jump to the method it points you to.
Plan: Blocking known integrations needs Pro or higher. Custom block rules need Advanced or higher. The blocked markup for theme scripts works on every plan.
The rule that matters: a tracker installed through a Shopify sales channel or a custom pixel is handled by the consent signal, and Cookie Bar deliberately does not touch it. A tracker pasted into your theme is handled by Auto-block cookies, which acts on <script src>, <iframe src> and <img src>.
Prerequisites
- The Avada - Script Blocker app embed must be on. See How to turn on Auto-block cookies.
- Your cookie banner must be on, so visitors can give the consent that releases the trackers.
Start here: find your tracker
| How the tracker was installed | What to do | Method |
|---|---|---|
| A Shopify sales channel app - Google & YouTube, Facebook & Instagram, TikTok | Turn the integration on, leave the ID empty | Method 1 |
| A custom pixel under Settings → Customer events | Nothing in Cookie Bar - set the pixel's permissions in Shopify | Method 1 |
| A vendor Cookie Bar integrates with, tag not in your theme | Turn the integration on and enter the ID | Method 2 |
| A vendor with no integration - Hotjar, Criteo, Snapchat, Reddit | Add a custom rule for its domain | Method 3 |
A tag pasted into theme.liquid with a working src | Make the tag inert with the blocked markup | Method 4 |
A tag high in <head>, or injected by your theme's JavaScript, that runs before Cookie Bar | Method 4, plus the early blocker snippet | Method 5 |
Method 1: Trackers Shopify already handles
A tracker installed through the Google & YouTube, Facebook & Instagram or TikTok sales channel app, or as a custom pixel under Settings → Customer events, runs inside a sandbox Shopify creates and controls. Cookie Bar cannot reach into it, and does not try to - it passes your banner's answer to Shopify, and Shopify applies it.
- Turn on the matching integration in Cookie Bar, and leave its ID field empty. An empty ID is how you tell Cookie Bar that Shopify owns this tag.
- For a custom pixel, open Settings → Customer events in Shopify and set the consent your pixel requires.
Do not enter the ID as well. If the sales channel app runs your tag and you also paste the same ID into Cookie Bar, the tag loads twice. You get duplicate page views and inflated event counts. Pick one owner per tracker.
Method 2: A vendor Cookie Bar integrates with
Cookie Bar has built-in coverage for six vendors. Turning the integration on tells Cookie Bar to hold that vendor's domains back while the visitor's consent is denied.
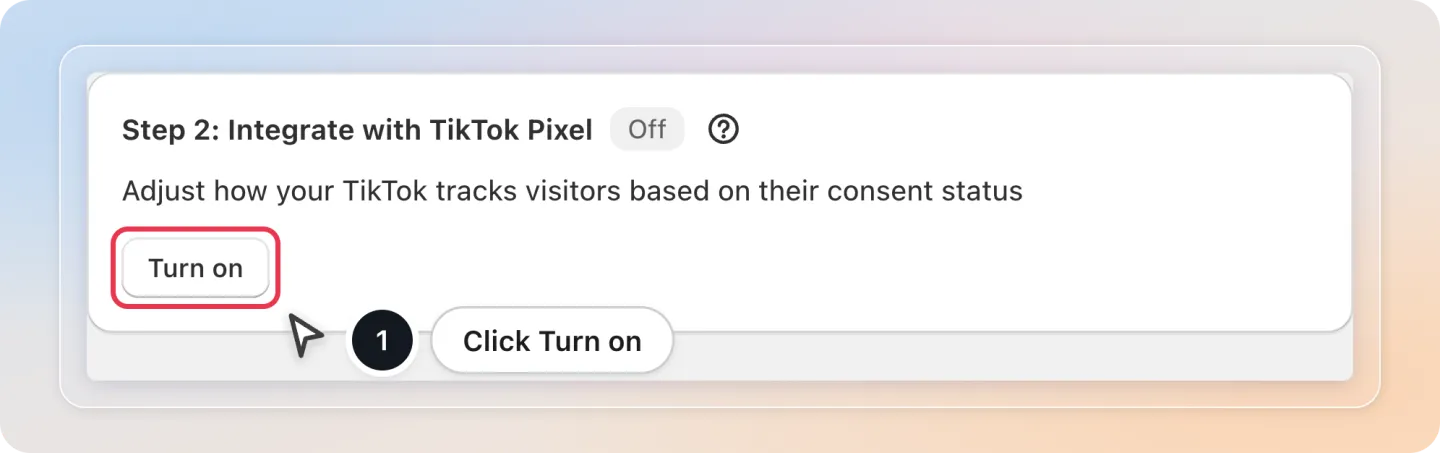
Step 1: Turn on the integration
Go to Integrations (GCM V2, Tiktok Pixel) in the left menu, open the service you use, and click Turn on.
Step 2: Enter the ID, if the integration asks for one
Google, Meta and TikTok each have an ID field, and that field decides who owns the tag. Paste the bare ID the vendor gives you - Cookie Bar does not need the snippet around it.
| Integration | ID to paste |
|---|---|
| Google Consent Mode | G-XXXXXXXXXX, AW-XXX-XXX-XXXX, GTM-XXXXXXX - comma-separate more than one |
| Meta Pixel | Your pixel ID, for example 1234567890 |
| TikTok Pixel | Your pixel ID, for example C4A9GJ2K1QF8D3PL |
Microsoft, Pinterest and Klaviyo have no ID field. Turning them on is enough.
| ID field | What Cookie Bar does | Use this when |
|---|---|---|
| Filled in | Owns the tag: loads it, applies consent to it directly, and holds the vendor's domains back while the visitor's consent is denied | Cookie Bar is the only thing running that tag |
| Empty | Sends the consent signal only. Does not load the tag, touch gtag or fbq, or block the vendor's domains, so the badge correctly reads Unblocked | The official sales channel app runs your tag |
The toggle and the ID are separate. Saving an ID without switching the integration on leaves the badge at Unblocked. Check both.
Step 3: Check the badges
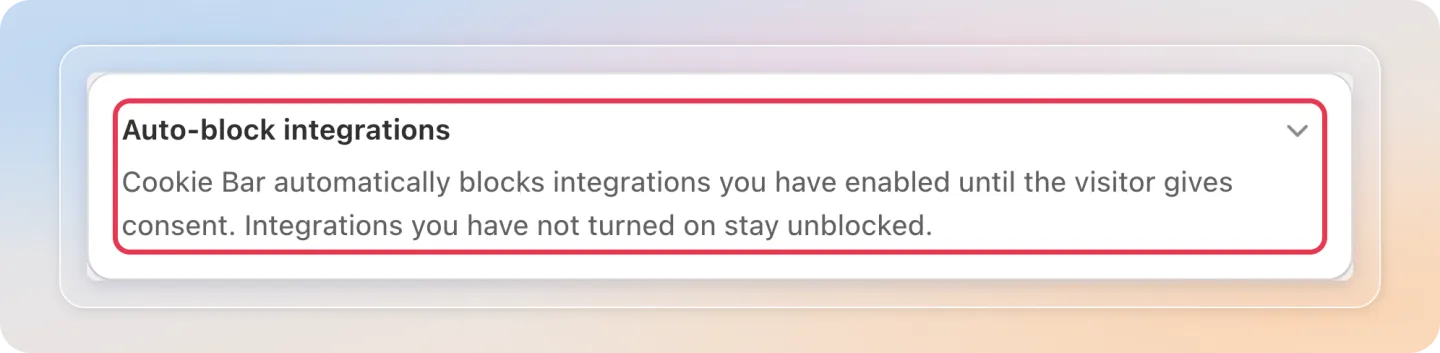
Go to Settings → Auto-block cookies and expand the Auto-block integrations card.
| Badge | What it means |
|---|---|
| Blocked | Cookie Bar holds this vendor's domains while the visitor's consent is denied |
| Unblocked | Cookie Bar leaves this vendor untouched, either because the integration is off, or because its ID field is empty |
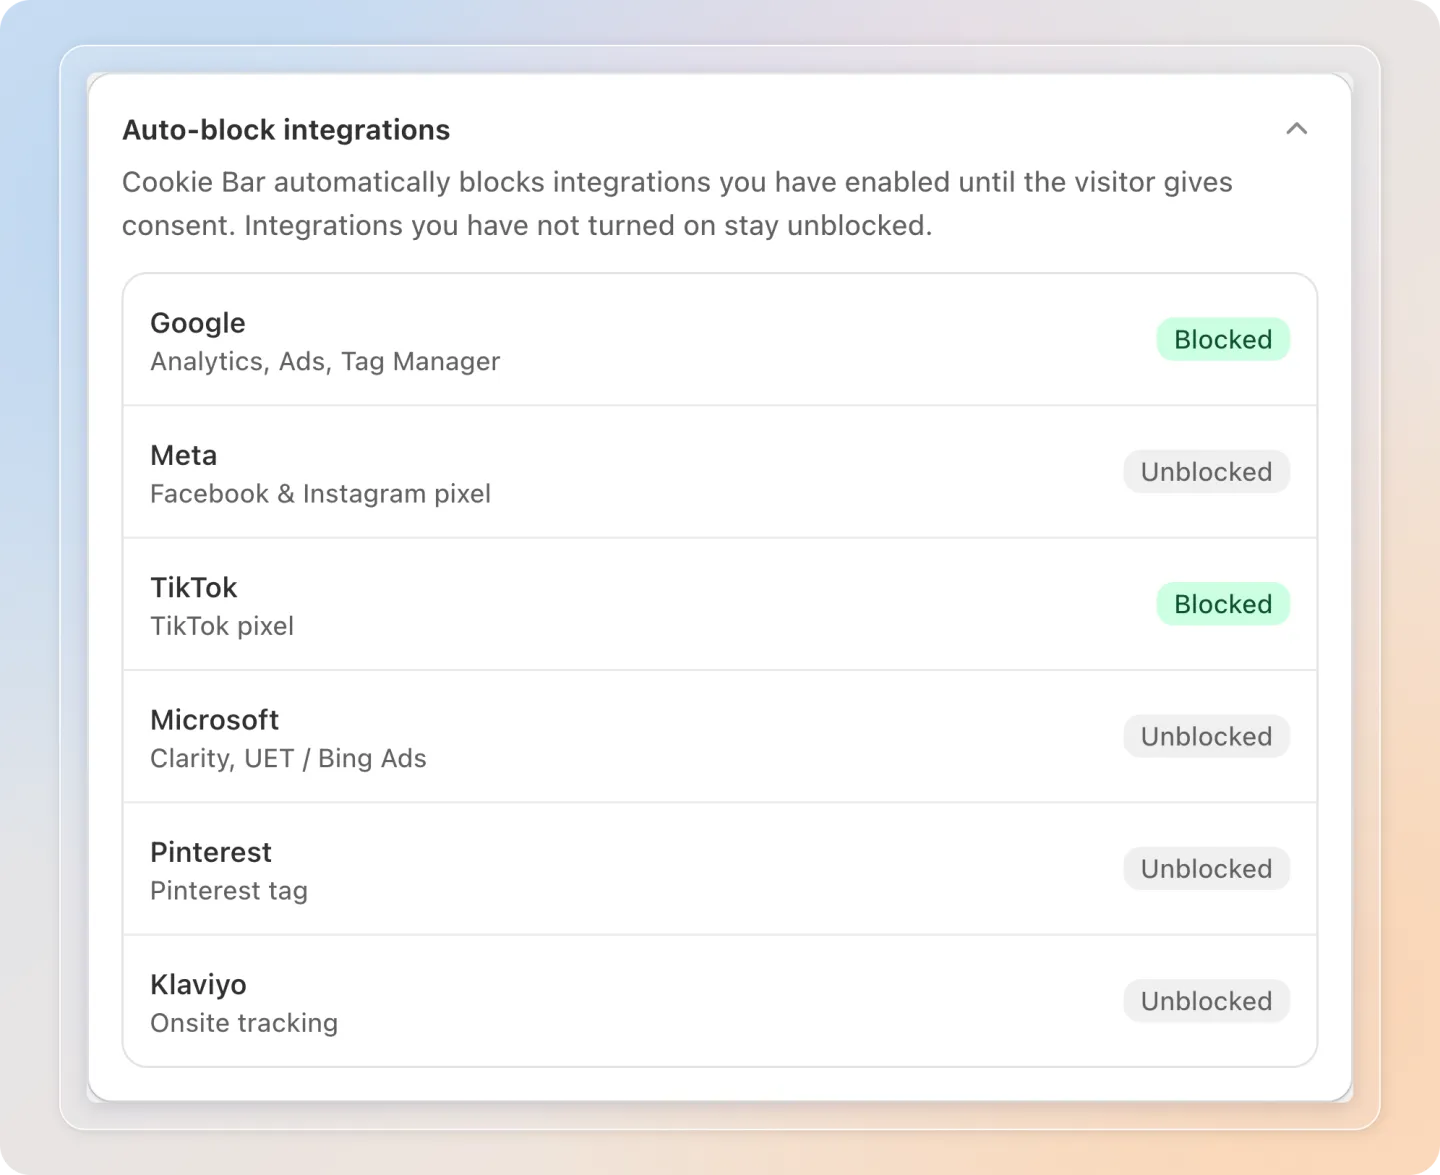
Note: This card is read-only. It reports what the storefront will actually do.
Domains each integration holds back
A domain matches if the host is the domain itself or a subdomain of it.
| Integration | Domains held back | Needs |
|---|---|---|
| Google Consent Mode | googletagmanager.com, google-analytics.com, analytics.google.com, googleadservices.com, googlesyndication.com, doubleclick.net | A GA4, AW or GTM ID |
| Meta Pixel | connect.facebook.net | A Pixel ID |
| TikTok Pixel | analytics.tiktok.com | A Pixel ID |
| Microsoft Consent Mode | bat.bing.com, clarity.ms | Integration on |
s.pinimg.com, ct.pinterest.com | Integration on | |
| Klaviyo | static-tracking.klaviyo.com, a.klaviyo.com | Integration on |
These lists apply to
<script src>only. They are not matched against<iframe>or<img>tags, so adoubleclick.netiframe or afacebook.com/trtracking pixel is not covered by turning the integration on. To hold those back, add a custom rule with the target set to Iframe or Pixel (img). See Method 3.
Two deliberate exceptions: Klaviyo's forms script static.klaviyo.com is left alone so sign-up forms keep working even while consent is denied, and clarity.ms sits in the Microsoft group, so turning on Microsoft Consent Mode also pauses Clarity session recording.
If the tag is also hardcoded in your theme
This is the case merchants get wrong most often: a vendor's tag pasted into theme.liquid and its ID entered in Cookie Bar loads twice. Pick one of these, not both:
| What you do | Result | |
|---|---|---|
| Hand the tag to Cookie Bar (simpler) | Remove the tag from theme.liquid, then enter the ID in Cookie Bar | Cookie Bar loads the tag once consent is granted and holds the vendor's domains while it is denied. No duplicates |
| Keep the tag in your theme | Leave the ID empty, and make the tag inert with Method 4 | The tag waits until consent is granted. The vendor's domains stay off the block list, so add a custom rule if the vendor injects further scripts of its own |
Method 3: A vendor with no integration
For any tracker outside the six integrations above - Hotjar, Criteo, Snapchat, Reddit, a self-hosted analytics domain, another app's script. You can add up to 50 rules.
Plan: The Custom scripts card is locked below the Advanced plan. Rules saved on a higher plan stay in the app if you downgrade, but they stop being applied on your storefront.
Step 1: Open the Custom scripts card
Go to Settings → Auto-block cookies and scroll to the Custom scripts card.
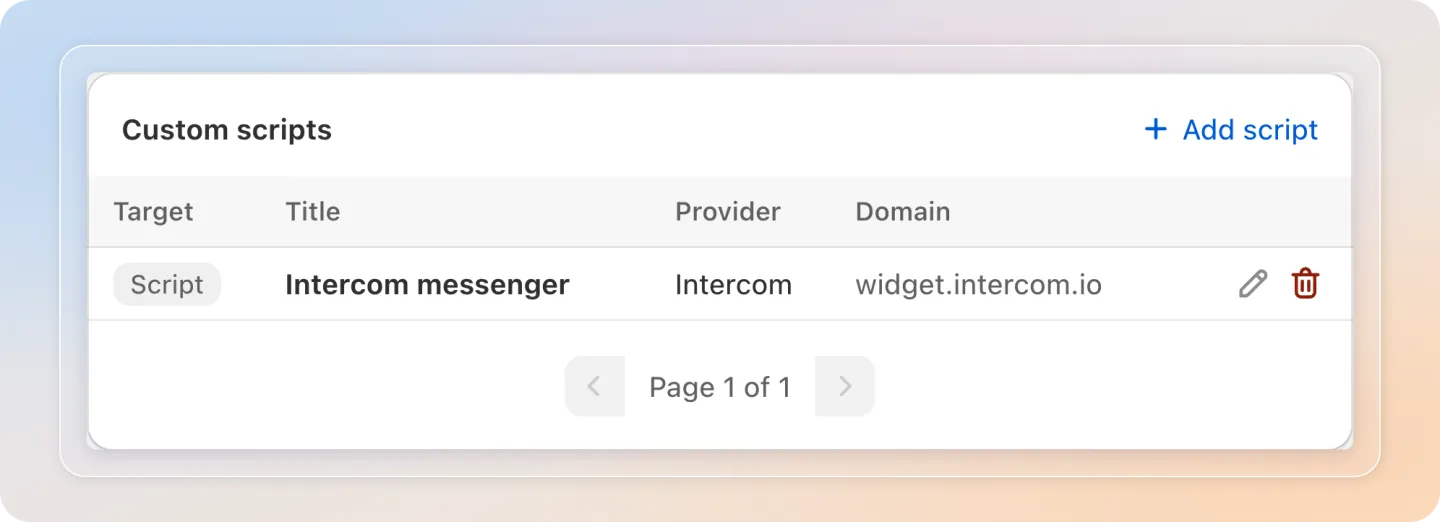
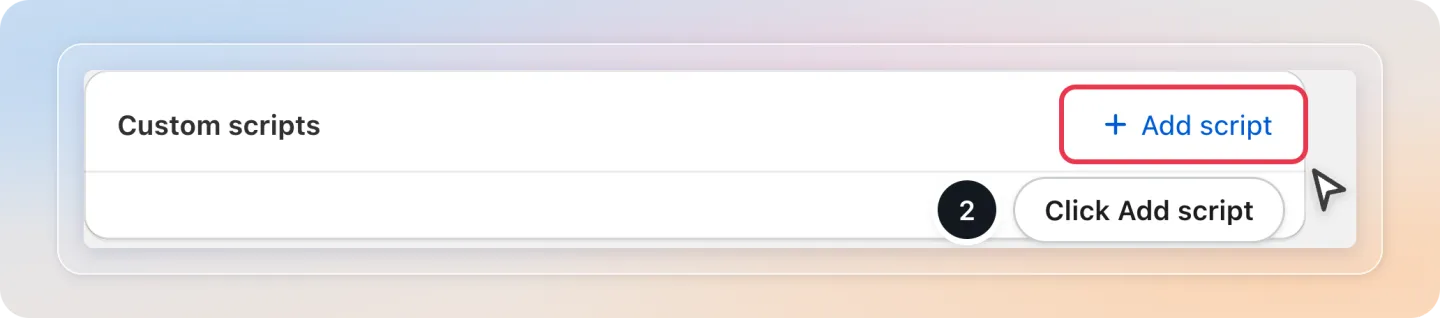
Step 2: Click Add script
Step 3: Choose the target type
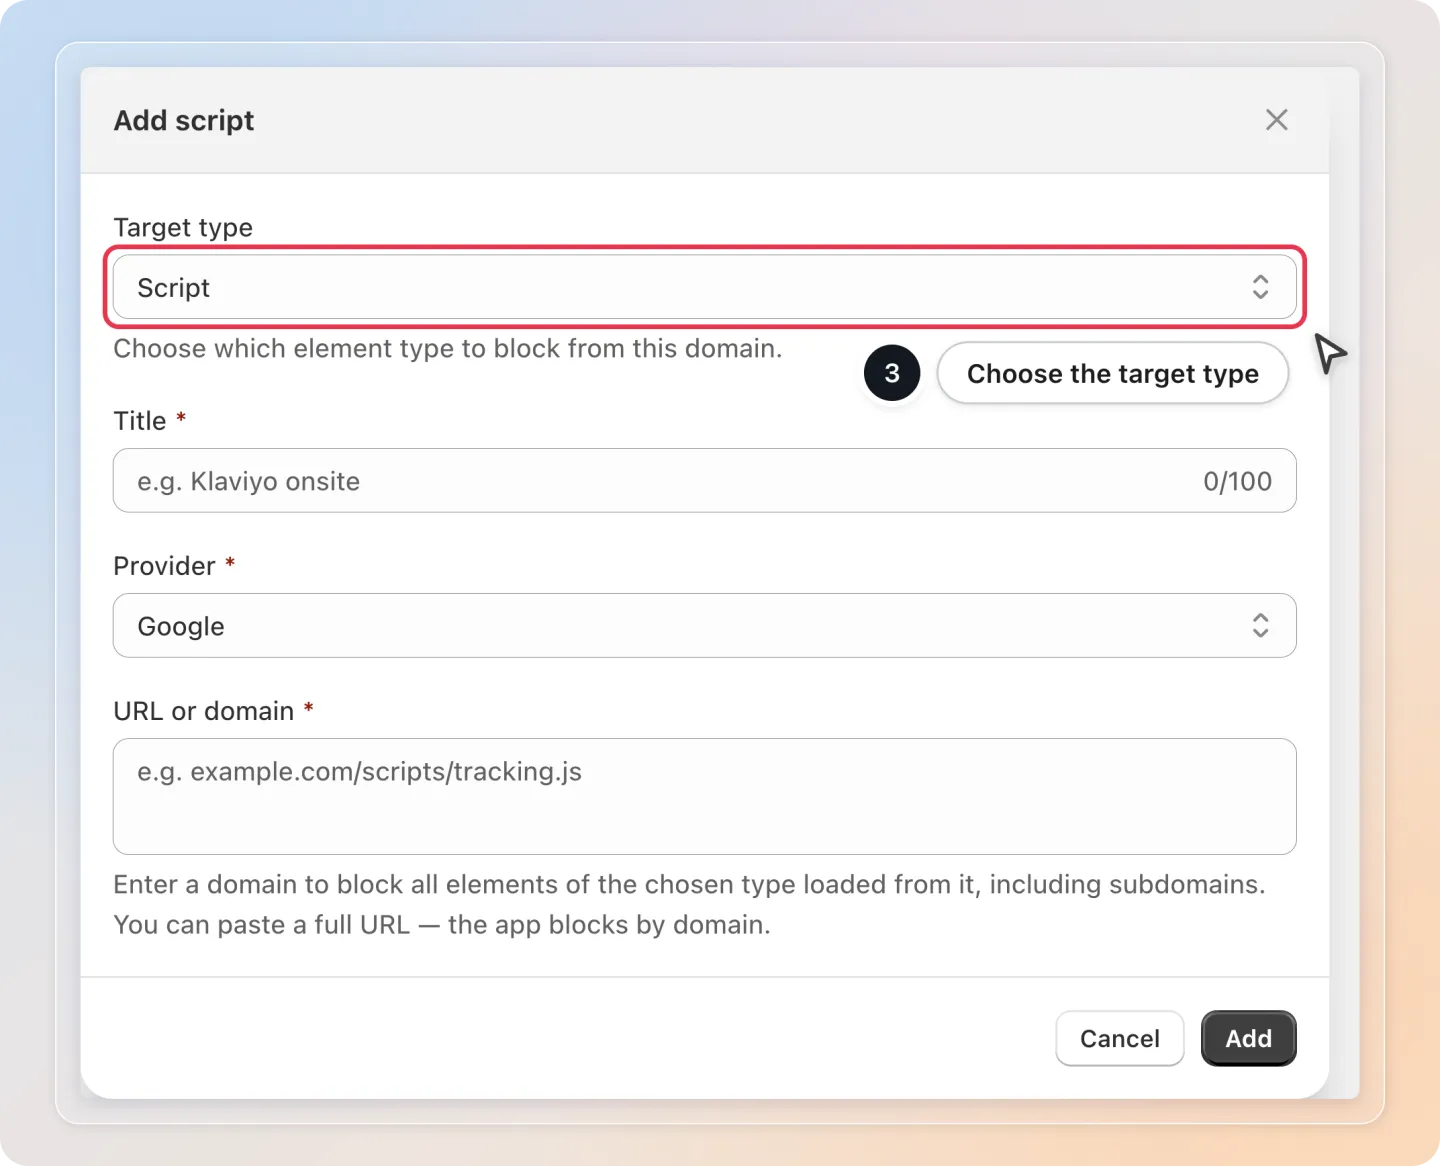
Pick the element type Cookie Bar should hold from that domain.
| Target type | Blocks |
|---|---|
| Script | <script> tags loaded from the domain |
| Iframe | <iframe> embeds loaded from the domain |
| Pixel (img) | Tracking pixels loaded as images |
Step 4: Fill in the details
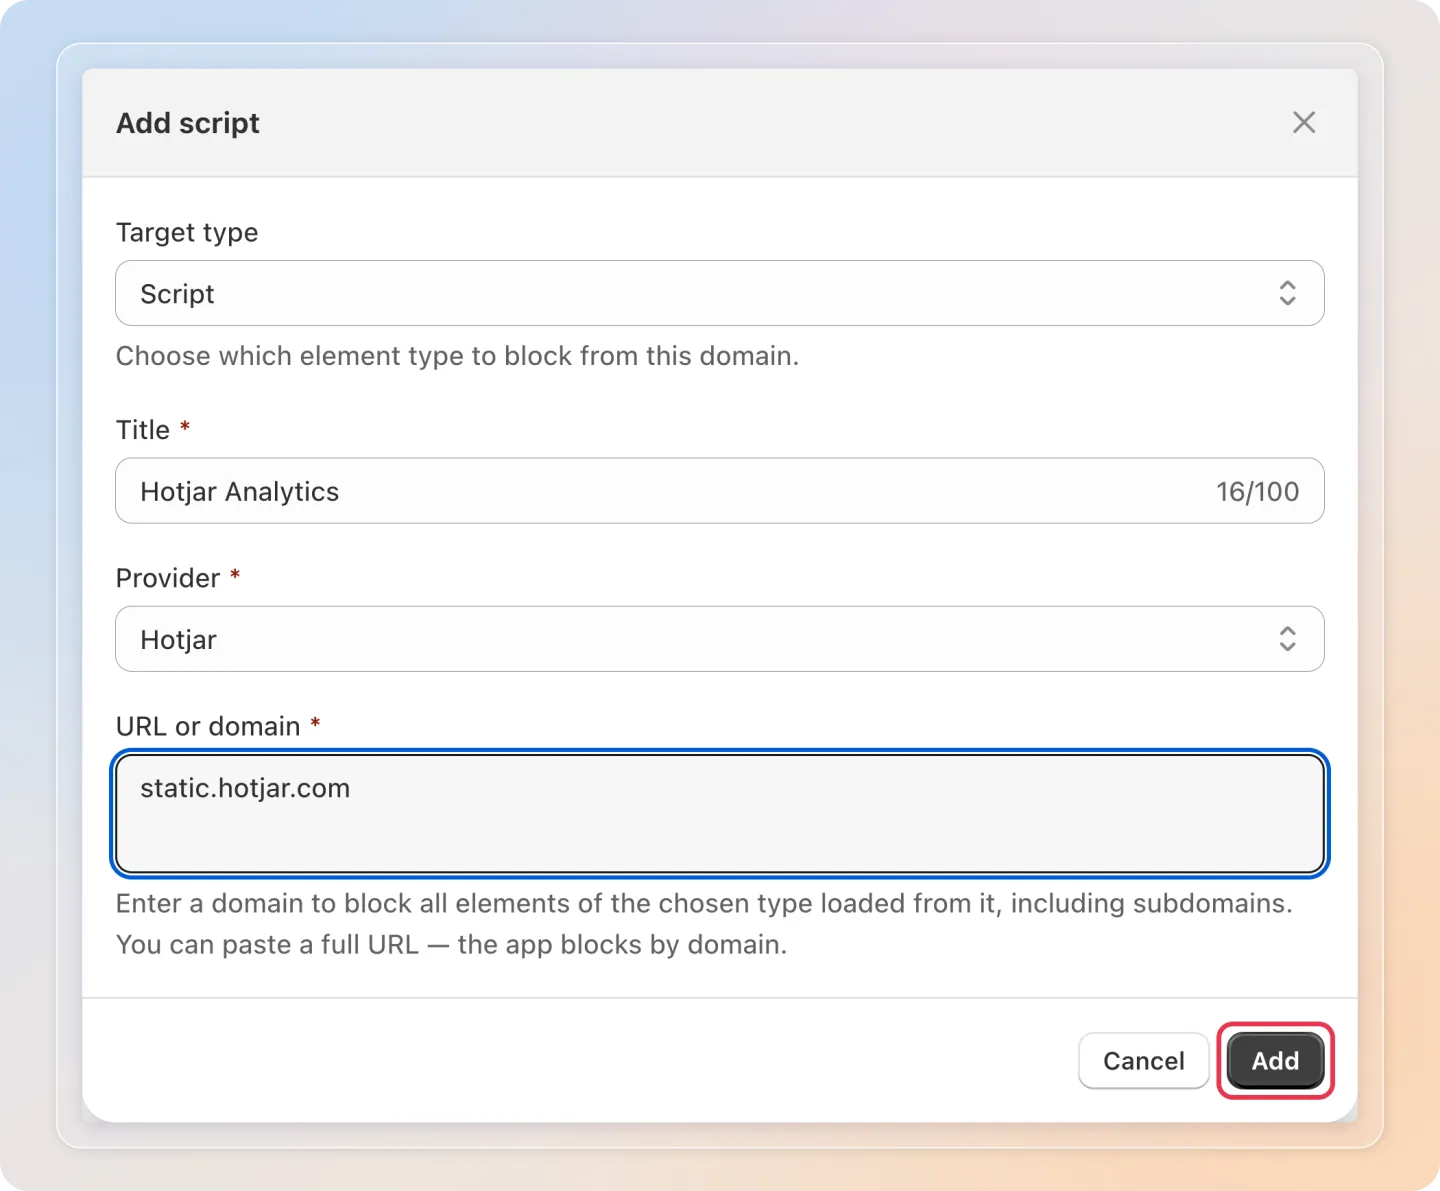
| Field | What to enter |
|---|---|
| Title | A short name you will recognise later, for example Hotjar Analytics |
| Provider | Pick a preset, or choose Custom and type the provider name |
| URL or domain | The domain to block, for example static.hotjar.com, or a full URL |
Note: A domain on its own, such as
example.com, blocks everything served from it and its subdomains. To block only part of a domain, add a path after it, for examplecdn.example.com/widget-assets/pixel: only URLs under that path are blocked. If you paste a full URL, its path is kept too, so the rule covers that file only.www., port numbers and query strings are removed.
Step 5: Save the rule
Click Add. The rule appears in the table and starts applying on your storefront right away.
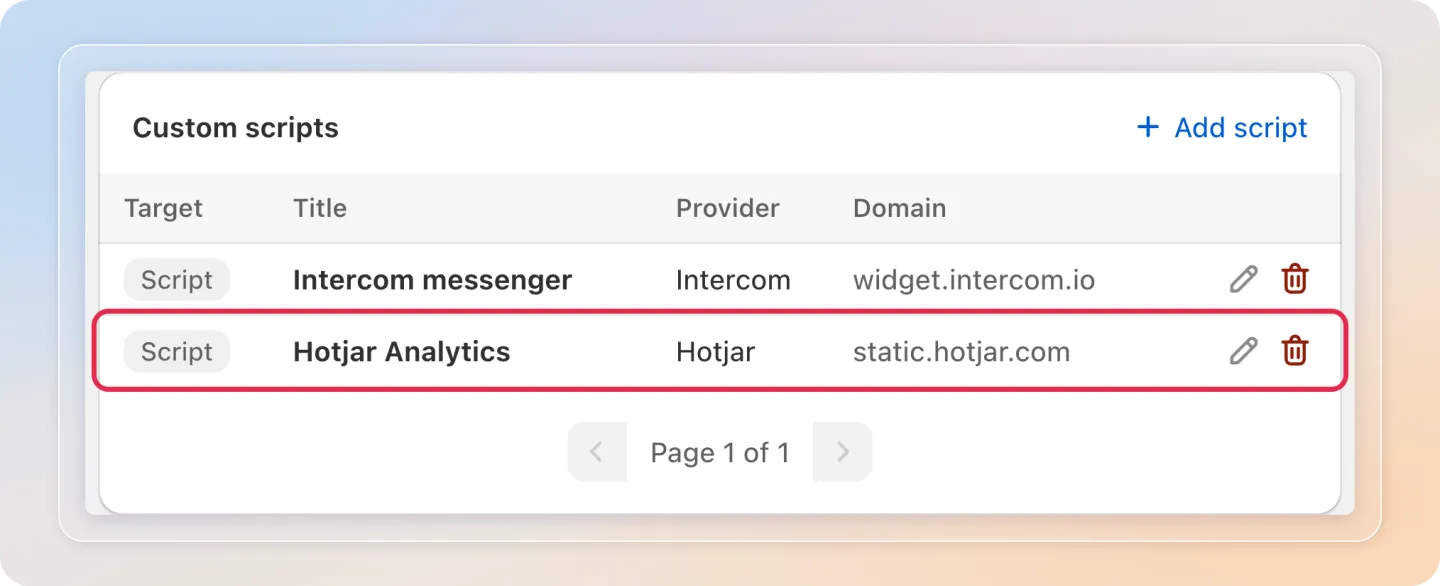
Examples: static.hotjar.com as a Script rule, youtube.com as an Iframe rule for embedded videos, a tracking-pixel host as a Pixel (img) rule. For YouTube specifically, switching the embed to youtube-nocookie.com is usually simpler than a rule.
Edit or delete a rule
- Click the edit icon on a row to change its target, title, provider or domain, then click Save.
- Click the delete icon, then confirm. Scripts from that domain will no longer be blocked when consent is denied.
Messages you may see
| Message | What to do |
|---|---|
| This domain is required by your store and cannot be blocked | Pick a different domain. Shopify's own domains, jQuery, jsDelivr, Cloudflare and Google's static and API hosts are protected - blocking them would break your storefront |
| This URL or domain is already in your block list | Edit the existing rule instead, or choose a different target type |
| Enter a valid URL or domain, e.g. example.com or example.com/tracking.js | Enter a real hostname such as example.com, or a full URL |
| You have reached the limit of 50 custom scripts... | Delete a rule you no longer need, then add the new one |
Method 4: A tag hardcoded in theme.liquid
A tag written directly into theme.liquid with a working src can be fetched by the browser before Cookie Bar gets there. To close that gap, make the tag inert in your theme and let Cookie Bar load the real script after the visitor accepts.
Plan: Available on every plan.
Step 1: Find the script in your theme
Open Online Store → Themes → Edit code and locate the tracking script in theme.liquid. It looks like this:
<script src="https://example.com/tracker.js"></script>Step 2: Replace the src attribute
Move the real URL into data-avada-blocked-src and set the type to javascript/blocked:
<script type="javascript/blocked"
        data-avada-blocked-src="https://example.com/tracker.js"></script>
Step 3: Save the theme
Click Save, and repeat for every hardcoded tracking script in the file.
Step 4: Verify it works
- Open your storefront in a private or incognito window.
- Open the browser Network tab and confirm the tracker does not load.
- Accept cookies on the banner.
- Cookie Bar loads the real script from
data-avada-blocked-src, and the request appears.
Three things to know
The tag must have no src left. As long as src is present the browser downloads and runs the script before Cookie Bar can stop it. Copy the URL exactly, too - a typo means the script never loads, even after consent.
Cookie Bar is the only thing that can bring these tags back. An inert tag has no src, so nothing else on your store will ever load it. Turn Auto-block off, disable the app embed or uninstall Cookie Bar and that tracker stops working entirely, silently and with no error. Put the original <script src="…"> tags back in your theme before removing the app.
Inline code cannot use this markup. Cookie Bar releases a blocked tag by loading the URL you stored, so a tag with no URL would stay blocked forever. Move the code into its own .js file, load that file with src, then apply the blocked markup to it.
One side effect to know about: a script restored after Accept is rebuilt as a fresh async tag in the page head, so type="module", defer, nonce and integrity are not carried over and the order between two restored scripts is not preserved. If a library tag is followed by an inline tag that calls into it, move the initialising code inside the library's own callback.
Method 5: A tag that runs too early
The app embed loads at Shopify's compliance_head position. A tag placed above it in your theme, or one your theme's own JavaScript injects before that point, can still get away.
If a tracker still fires after Method 4, add the early blocker snippet: it installs the same interception at the very top of <head>. It does not replace Method 4, because a tag still carrying a live src is fetched before any JavaScript runs. Use both.
See How to add the early blocker snippet.
Check it worked
Open your storefront in a private window, decline on the banner, then open the console.
| Run this | What you should see |
|---|---|
document.querySelectorAll('script[data-avada-blocked-src]').length | Greater than zero means Cookie Bar is holding tags back |
window.__avadaBlockerConfig | blockedScriptHosts lists the built-in domains, customHosts your own rules. If the whole object is undefined, Auto-block is off or the app embed is disabled |
Shopify.customerPrivacy.userCanBeTracked() | false after declining means the consent signal reached Shopify, so its sandbox pixels are held back too |
Now accept. The blocked count should drop to zero and your trackers should start loading.
An empty
blockedScriptHostswith Google, Meta or TikTok switched on is normal - those integrations are in consent-signal mode with the ID field empty. See Method 2.
Troubleshooting
| Symptom | Cause | Fix |
|---|---|---|
| Nothing is blocked at all | The app embed is off, or the tracker is not in your theme | Turn on Avada - Script Blocker. A tracker from a sales channel app is not meant to be blocked - Shopify handles it |
| A Meta or Google pixel stopped recording | An ID was entered in Cookie Bar while the official channel app also runs the tag | Clear the ID and keep the integration on - but only if the tag is not also pasted in your theme, because clearing the ID stops Cookie Bar holding that vendor's domains at all |
| Duplicate events in Meta or GA4 | The same tag is owned by both Cookie Bar and the channel app | Pick one owner: clear the ID, or uninstall the channel app |
| A tracker still fires when consent is denied | The vendor has no integration, or the tag has a live src in the theme | Add a custom rule (Method 3) and use the blocked markup (Method 4) |
| Badge says Unblocked although you filled the ID in | The integration toggle is still off | Switch the toggle on and save. An ID on its own does not turn blocking on |
| Blocked in one country, not another | Your banner is limited to certain regions | Expected. Widen the banner's regions to block everywhere |
| Tracking cookies still present after declining | They were set before the visitor declined | Expected. Cookie Bar blocks the script that would set new ones; it does not delete existing cookies |
| Custom rules do nothing | Your plan is below Advanced | Upgrade. Your rules stay saved in the meantime |
Related articles
- What is Auto-block cookies?
- How to turn on Auto-block cookies
- How to add the early blocker snippet
- Auto-block cookies FAQ
And there you have it! Every tracker on your store now has a blocking method that matches how it was installed. If you have any questions or run into any issues, don't hesitate to reach out. We're here to help!
Previous: How to turn on Auto-block cookies | Next: How to add the early blocker snippet